1.0 Introduction: The Cornerstone of Liquid Handling
1.1 What is a Pipette? Defining its Fundamental Role in the Modern Laboratory
|
|
 |
 |

In the landscape of modern science, few instruments are as ubiquitous or as fundamental as the pipette. At its core, a pipette is a laboratory instrument engineered for a single, critical purpose: the precise measurement and transfer of small quantities of liquid. These volumes typically range from milliliters (mL), equivalent to one-thousandth of a liter, down to microliters (uL), or one-millionth of a liter. This capability makes the pipette an indispensable tool across a vast spectrum of scientific disciplines, including chemistry, molecular biology, medical science, food safety analysis, and clinical diagnostics.
The significance of the pipette extends far beyond simple liquid transfer. In countless experimental workflows, the accuracy and reproducibility of the results hinge directly on the proper and precise use of this instrument. From preparing reagents for a polymerase chain reaction (PCR) to diluting patient samples for clinical analysis, even the slightest deviation in volume can significantly alter experimental outcomes, rendering results unreliable or invalid. Consequently, the pipette functions as a high-precision extension of the scientist’s hands, enabling the meticulous manipulation of liquid volumes that are far too small for crude measurement techniques. It is not merely a tool but a cornerstone of quantitative science, a device whose correct application underpins the very integrity of research and diagnostic data.
1.2 A Brief History: From Pasteur’s Dropper to Precision Engineering
 |
The evolution of the pipette is a story that mirrors the progression of science itself—from qualitative observation to quantitative precision. The journey began in the 19th century with the pioneering work of French chemist and microbiologist Louis Pasteur. Often credited as the “Father of Medical Microbiology,” Pasteur developed simple, uncalibrated glass tubes to transfer liquids in his laboratory, a design now universally recognized as the Pasteur pipette or dropper. This rudimentary invention was revolutionary, as it provided a method to move liquids without direct contact, helping to prevent contamination and marking a significant step away from the dangerous and unhygienic practice of mouth pipetting, which was common at the time.
For decades, these simple glass tubes were the standard. However, as science advanced, the need for greater accuracy and the ability to handle much smaller volumes became paramount. The true paradigm shift occurred in 1957, born from the frustration of a German physician, Dr. Heinrich Schnitger, at the University of Marburg. Tasked with the tedious and imprecise work of repeatedly pipetting small volumes with glass capillaries, Schnitger engineered the first prototype of the modern micropipette. His ingenious design incorporated a spring-loaded piston to create a vacuum, an internal air cushion to separate the piston from the sample, and a removable plastic tip to prevent cross-contamination. These features remain the foundational principles of most micropipettes used today. Schnitger patented his device, titled “Device for the fast and exact pipetting of small liquid volumes,” which was approved in 1961.
Schnitger’s invention caught the attention of the German biotech firm Eppendorf, which acquired the rights in the 1960s and began mass production, making these precision instruments globally accessible and cementing their place in laboratories worldwide. The final piece of the modern pipette puzzle fell into place in the 1970s, when American scientists Warren Gilson and Henry Lardy developed the first adjustable-volume micropipette. This crucial enhancement gave researchers the flexibility to set a precise volume within a given range, transforming the micropipette from a fixed-volume device into a versatile instrument capable of meeting the dynamic demands of modern research.
This historical trajectory reveals a critical transformation. The pipette evolved from a simple tool designed by Pasteur to prevent contamination into a precision instrument engineered by Schnitger, Gilson, and Lardy to generate accurate, reproducible quantitative data. This evolution was not accidental; it was driven by the increasingly rigorous demands of science as it moved from broad observation to the micro-level analysis of molecules, genes, and cells. The modern, advanced pipettes available today are the direct descendants of this legacy, designed to meet the ever-growing challenges of 21st-century scientific discovery.
2.0 The Anatomy of a Modern Pipette
2.1 Core Components of a Piston-Driven Pipette
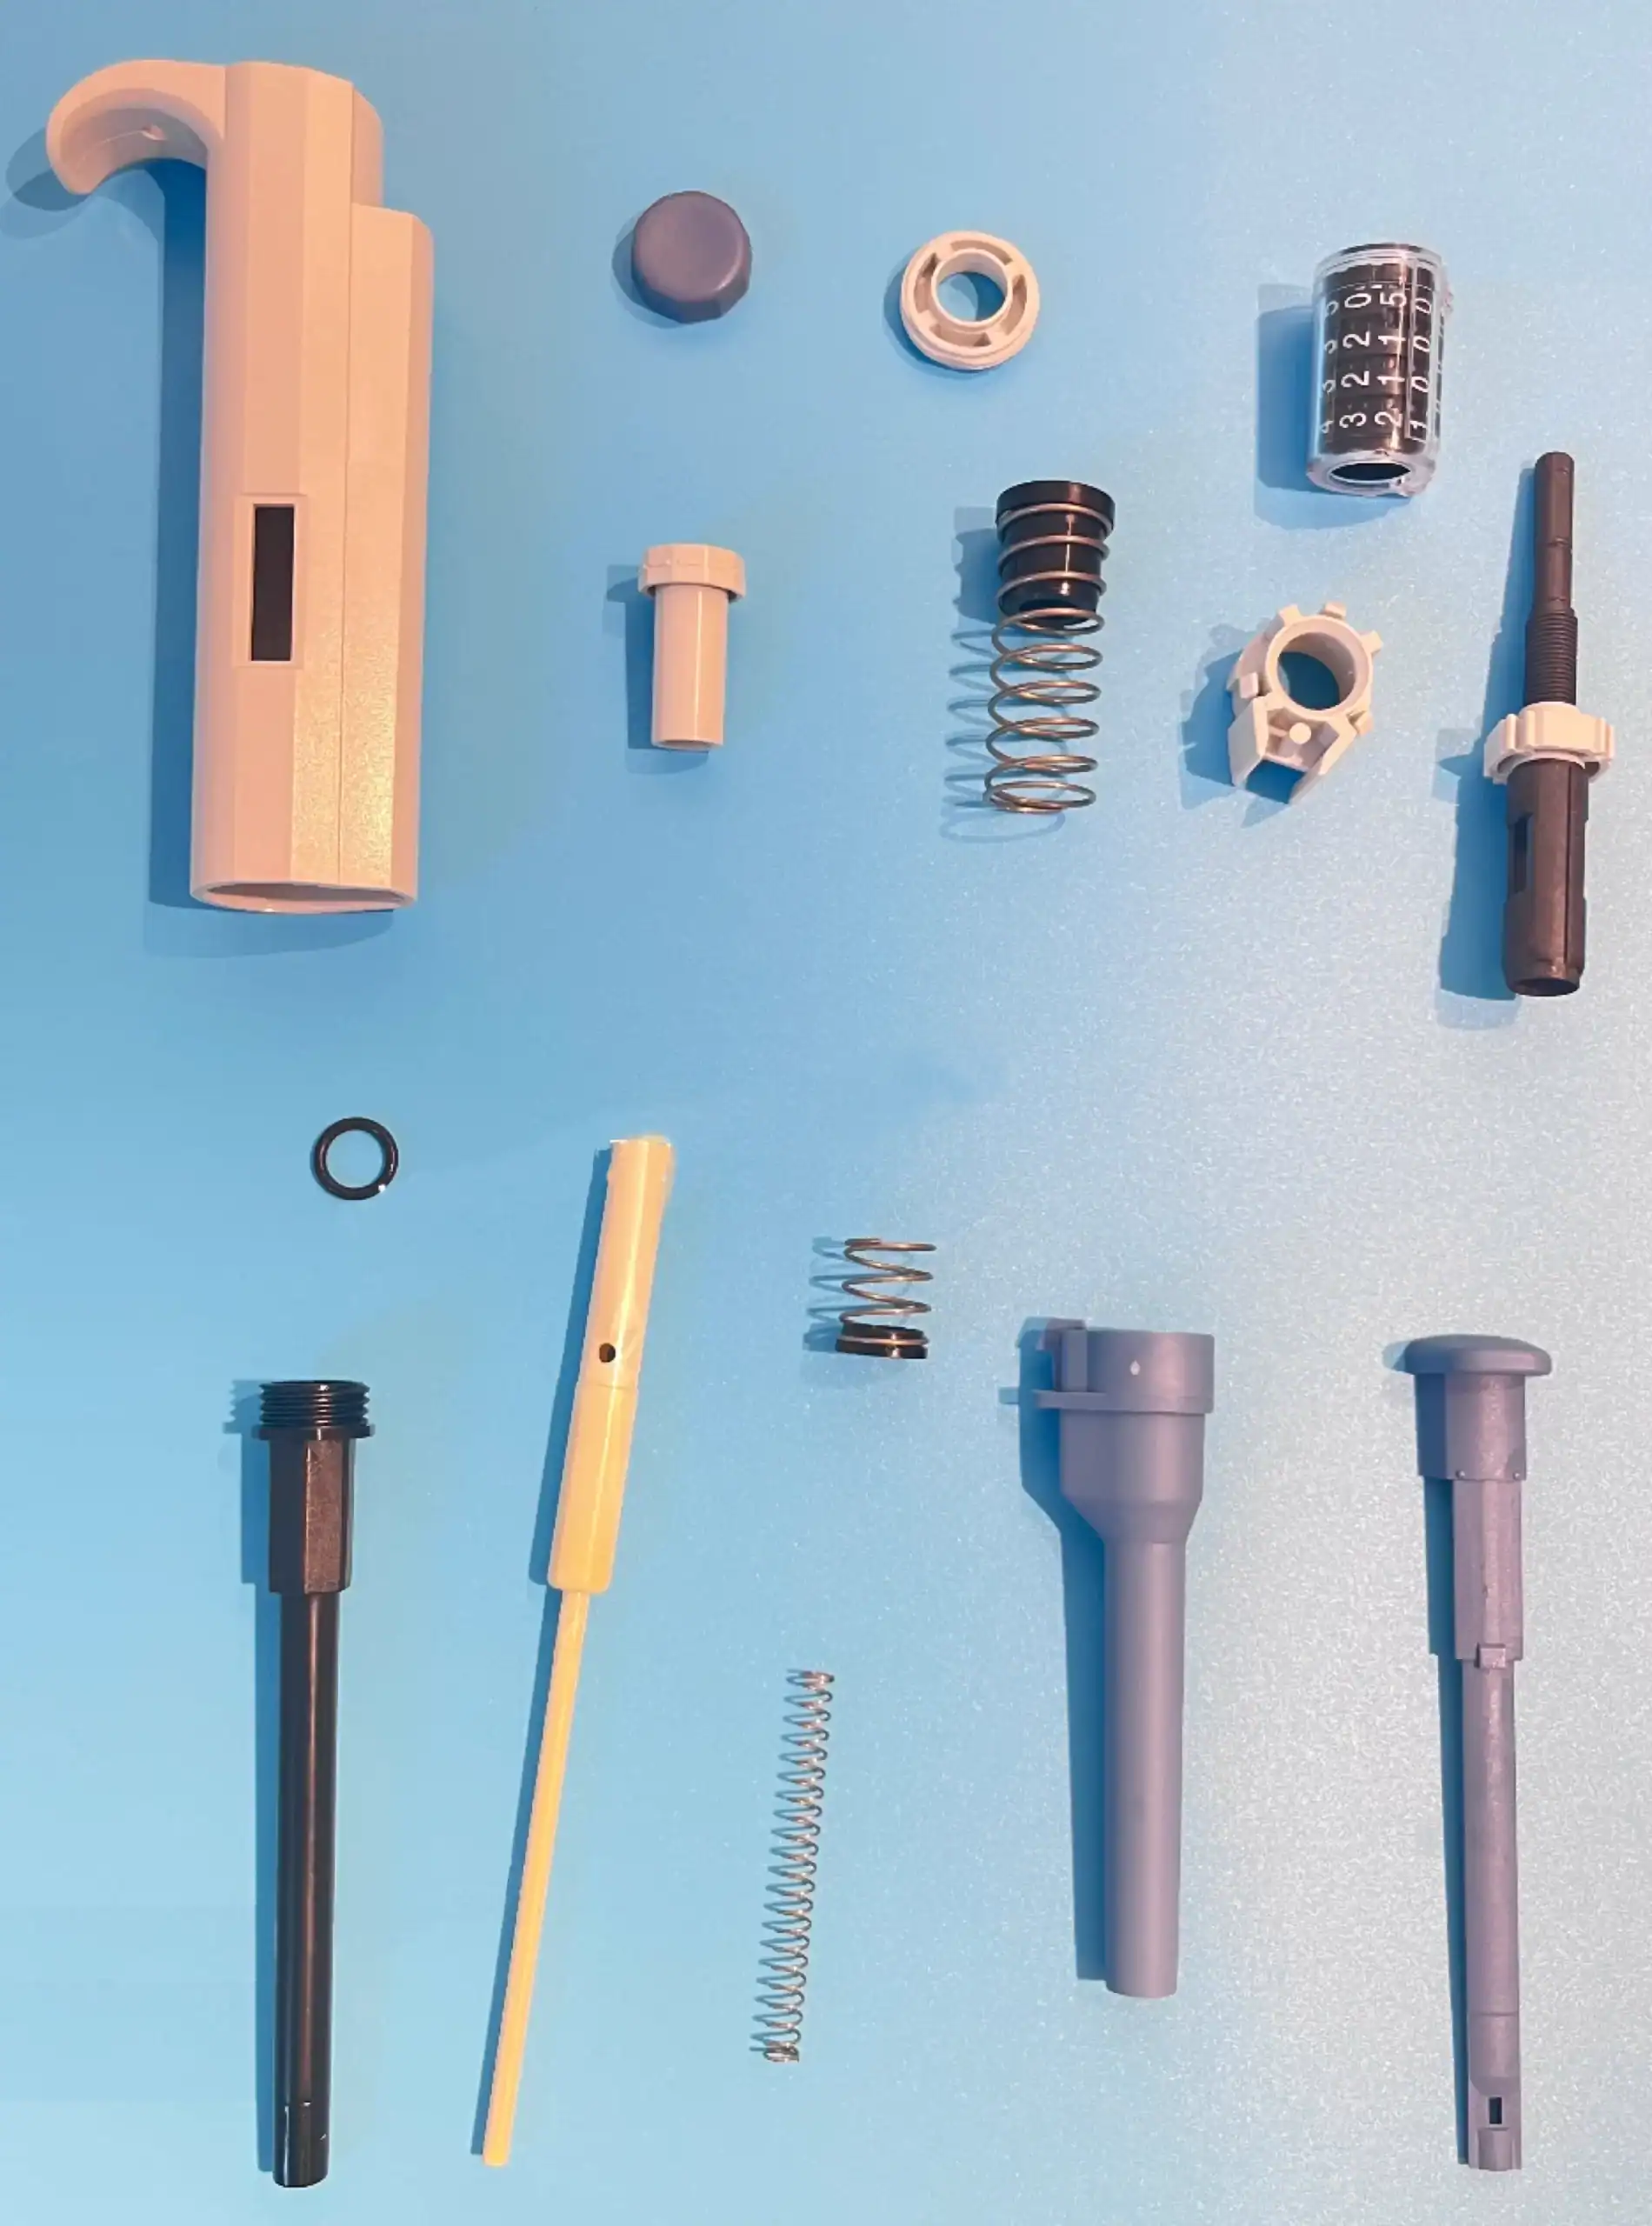
Understanding how to operate a pipette effectively begins with recognizing its key components. While designs vary between manufacturers and models, the modern piston-driven micropipette shares a common anatomy engineered for precision, ergonomics, and safety.
 |
- Plunger/Push-button: This is the primary user interface for controlling the pipette. It is used to both aspirate and dispense liquid. Most manual air-displacement pipettes feature a two-stop mechanism. The first stop is used to measure the set volume for aspiration and dispensing. The second, “blow-out” stop is used to expel any residual liquid remaining in the tip after a standard dispense.
- Volume Adjustment Knob: This mechanism, often integrated with the plunger or as a separate thumbwheel, allows the user to set the desired liquid volume. The selected volume is displayed on a mechanical or digital counter, known as a volumeter, located on the handle.
- Volume Lock Mechanism: A critical feature on many modern pipettes, the volume lock prevents the volume setting from being accidentally changed during repetitive pipetting tasks. This safeguard is essential for maintaining accuracy and reproducibility throughout a long experiment.
- Tip Ejector Button: Positioned for easy access by the thumb, this button activates a mechanism that pushes the disposable tip off the shaft. This allows for safe, hands-free tip removal, which is crucial for minimizing the risk of cross-contamination and preventing user contact with potentially hazardous samples.
- Shaft/Tip Cone: This is the lower part of the pipette body onto which a disposable pipette tip is fitted. The quality of the seal between the tip cone and the tip is paramount for accurate liquid aspiration.
- Internal Piston and Spring Mechanism: Hidden within the body of the pipette, this is the engine of the device. The vertical movement of a precision-engineered piston, driven by the plunger and spring assembly, creates the partial vacuum required to aspirate liquid into the tip.
See below our real pipette parts:
 |
2.2 The Pipetting System: The Symbiotic Relationship Between Pipette and Tip
|
|
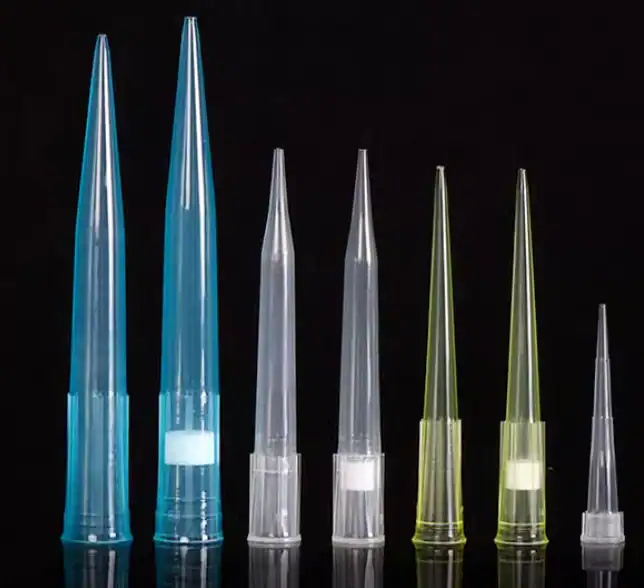
A common misconception among new users is that a pipette’s performance is determined solely by the instrument itself. In reality, a pipette and its disposable tip function as a single, integrated system. The accuracy, precision, and overall reliability of every measurement depend on the symbiotic relationship between these two components.
The quality and compatibility of the pipette tip are non-negotiable for achieving reliable results. Using low-quality or mismatched tips, often marketed as “universal,” can introduce a host of problems. A poor fit between the tip and the pipette’s shaft can create an imperfect seal, leading to air leaks during aspiration and resulting in the uptake of an incorrect volume of liquid. This compromises accuracy and precision, undermining the entire purpose of using the instrument.
This “system” concept has been formally codified in the latest international standard for pipette calibration, ISO 8655:2022. This standard explicitly states that a pipette must be calibrated with the exact type of tip that will be used for its application, effectively treating the pipette and tip as a single, inseparable unit for calibration purposes. This has profound implications for laboratory practice and procurement. It invalidates the old paradigm of purchasing a high-quality pipette from one manufacturer and using it with the cheapest available “compatible” tips from another. To ensure ISO-compliant accuracy, laboratories must now consider the pipette and its tips as a packaged system. This shift guides purchasing decisions toward a single-vendor ecosystem for critical, calibrated workflows, ensuring that the performance validated during calibration is replicated in daily use. For distributors and retailers, this presents an opportunity to educate customers on the importance of system integrity and to provide certified pipette-and-tip combinations that guarantee performance and compliance.
A specialized type of tip, the filter tip (also known as a barrier or aerosol-resistant tip), plays a crucial role in protecting this system. These tips contain a porous barrier that prevents liquid aerosols from being accidentally aspirated into the internal mechanism of the pipette. This is essential for preventing contamination of the pipette’s piston and shaft, which could not only damage the instrument but also lead to cross-contamination between subsequent samples. Filter tips are considered mandatory for highly sensitive applications such as PCR, working with RNA, handling infectious or radioactive materials, and any procedure where preventing sample carry-over is critical.
3.0 A Comprehensive Typology of Pipettes
The world of pipettes is diverse, with different types designed to meet specific laboratory needs related to liquid properties, volume, throughput, and required accuracy. Understanding this typology is essential for selecting the right instrument for any given task.
3.1 The Primary Divide: Air Displacement vs. Positive Displacement Pipettes
The most fundamental distinction in modern piston-driven pipettes lies in their operating principle: air displacement or positive displacement.
Air Displacement Principle Air displacement pipettes are the most common type found in laboratories and are the workhorses for a majority of applications. Their mechanism involves an internal piston that moves within a cylinder, but this piston never makes direct contact with the liquid sample. Instead, a cushion or pocket of air is trapped between the piston and the surface of the liquid inside the disposable tip.
The process works as follows:
- Aspiration: The user presses the plunger to the first stop, which moves the internal piston downward and displaces a specific volume of air from the tip.
- When the tip is submerged in the sample and the plunger is released, the piston moves upward, creating a partial vacuum. The ambient air pressure then pushes the liquid into the tip to fill this vacuum, with the volume aspirated being equal to the volume of air that was displaced.
- Dispensing: Pressing the plunger back to the first stop moves the piston down again, using the air cushion to push the liquid out of the tip. Pressing further to the second “blow-out” stop expels any remaining liquid.
Air displacement pipettes are highly accurate and precise when used with standard aqueous solutions like buffers, diluted acids, and most cell culture media. However, their performance can be affected by the physical properties of the liquid and environmental conditions. The air cushion can be compressed or expanded by temperature and atmospheric pressure changes, and it can be compromised by the viscosity, density, and volatility of the sample liquid.
Positive Displacement Principle Positive displacement pipettes are specialist instruments designed to overcome the limitations of the air displacement mechanism, particularly when handling “problem” liquids. The key difference is the complete elimination of the air cushion. In this system, the disposable tip is a microsyringe containing its own piston. This piston comes into direct contact with the liquid sample.
The process is analogous to a syringe:
- The disposable piston moves up within the tip’s capillary, drawing the liquid directly behind it.
- To dispense, the piston moves down, forcing the liquid out. This direct action effectively wipes the capillary walls clean, ensuring that the entire volume is dispensed.
Because there is no air cushion to be affected by liquid properties, positive displacement pipettes provide exceptional accuracy and reproducibility when working with:
- Viscous liquids like glycerol, oils, or protein-rich solutions, which can stick to the walls of a standard tip.
- Volatile liquids like acetone or methanol, which can evaporate into the air cushion of a standard pipette, causing leakage and inaccurate delivery.
- Hot or cold liquids (e.g., PCR reagents, enzymes kept on ice), which can cause the air cushion to expand or contract, leading to under- or over-aspiration.
- Dense, foaming, or hazardous/radioactive samples where containment and precision are paramount.
The primary trade-off is the cost and complexity of the disposable tips, which are more expensive than standard air displacement tips due to their integrated piston.
|
|
|

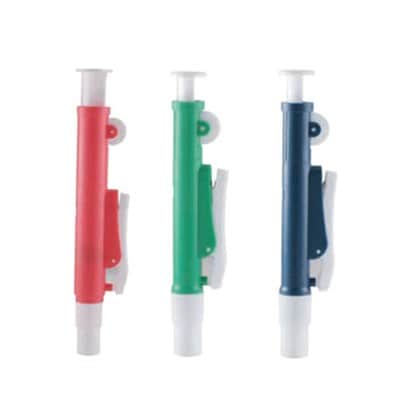
Table 3.1: Air Displacement vs. Positive Displacement Pipettes: A Comparative Analysis
| Feature | Air Displacement Pipette | Positive Displacement Pipette |
|---|---|---|
| Working Principle | An internal piston displaces a cushion of air, which in turn aspirates and dispenses the liquid. The piston does not touch the sample. | A disposable piston integrated within the tip makes direct contact with the liquid, functioning like a syringe. There is no air cushion. |
| Ideal Liquid Types | Aqueous solutions, buffers, diluted acids and bases, most cell culture media. | Viscous, volatile, dense, foaming, hot, cold, radioactive, or corrosive liquids. |
| Challenging Liquids | Performance is compromised by viscous, volatile, dense, or liquids with temperatures different from ambient. | Not suitable for routine pipetting of simple aqueous solutions due to higher consumable cost. |
| Key Advantages | Cost-effective, versatile for general lab work, wide availability of tips, simple mechanism. | High accuracy and precision with “problem” liquids, unaffected by sample properties, eliminates aerosol contamination risk. |
| Key Disadvantages | Inaccurate with challenging liquids, susceptible to environmental changes, risk of aerosol contamination of the pipette shaft. | Higher cost of specialized disposable tips (capillary pistons), may require more steps to attach tips. |
| Contamination Risk | Moderate. Aerosols can contaminate the internal piston. Risk is mitigated by using filter tips. | Very low. The disposable piston and capillary contain the sample, protecting the user and the instrument. Ideal for sensitive samples like DNA/RNA. |
| Typical Applications | General molecular biology, biochemistry, sample preparation, dilutions, reagent addition. | Genomics (DNA/RNA work), proteomics (viscous protein solutions), handling organic solvents, PCR/qPCR setup, pharmaceutical formulation. |
Discover HINOTEK full lineup of advanced Pipette and Pipette Controller.
3.2 The Operational Spectrum: Manual vs. Electronic Pipettes
Another critical distinction is the method of operation: manual or electronic. This choice directly impacts user experience, throughput, and the potential for human error.
The apperance of Manual Pipettes and Electronic Pipettes:
|
|
|

Manual Pipettes Manual pipettes are the classic design, operated entirely by the user’s physical action. The user depresses the plunger with their thumb to control the piston’s movement for aspiration and dispensing. They are generally more cost-effective and are well-suited for laboratories with low-throughput needs, for simple or occasional pipetting tasks, or for training purposes. Their simplicity is their strength, but it is also their primary limitation.
Electronic Pipettes Electronic pipettes incorporate a small internal motor that drives the piston’s movement, which is controlled by the simple press of a button rather than a manual plunger stroke. While they represent a higher initial investment, they offer a suite of advantages that can provide significant long-term value.
- Improved Accuracy and Precision: The motorized piston control ensures that every aspiration and dispensing action occurs at the exact same speed and force. This eliminates the user-to-user variability inherent in manual pipetting—such as differences in thumb pressure or plunger speed—which leads to significantly more consistent and reproducible results.
- Enhanced Ergonomics: One of the most significant benefits is the drastic reduction in thumb force required for operation. This dramatically lowers the risk of developing musculoskeletal disorders like Repetitive Strain Injury (RSI), often called “pipettor’s thumb,” which is a common ailment for technicians performing long, high-volume pipetting sessions.
- Advanced Functionality: Electronic pipettes are programmable microprocessors. They offer multiple operational modes that can automate complex and tedious tasks, such as:
- Multi-dispensing (Repeat Dispensing): Aspirating a large volume once and then dispensing it in multiple, equal, smaller aliquots.
- Diluting and Mixing: Automating the aspiration of multiple liquids and subsequent mixing cycles within the tip.
- Titration: Precise, step-wise dispensing for titration applications.
- Protocol Storage: The ability to save and recall frequently used protocols, ensuring consistency across experiments and operators.
The choice between manual and electronic pipettes often comes down to a careful analysis of the laboratory’s workflow. For labs with high throughput, complex protocols, or a focus on minimizing sources of error, the investment in electronic pipettes is often justified. The decision is not merely about convenience; it is a strategic choice that directly addresses what can be termed the “Ergonomics-Accuracy-Throughput Triad.” There is a clear causal chain: extensive manual pipetting leads to repetitive motion, which increases the risk of RSI. This physical fatigue and discomfort lead to inconsistent plunger operation, which in turn degrades pipetting precision and accuracy. The final result is unreliable data, wasted reagents, and lost time. Electronic pipettes effectively break this chain by automating the physical action, thereby protecting the health of the operator, the integrity of the data, and the efficiency of the lab. This transforms the higher initial price from a simple “cost” into a strategic “investment” in quality, reproducibility, and personnel well-being.
3.3 Throughput and Efficiency: Single-Channel vs. Multichannel Pipettes
The physical configuration of a pipette determines its suitability for different scales of work, primarily distinguishing between single-channel and multichannel models.
|
|
|


Single-Channel Pipettes A single-channel pipette has one shaft and uses one tip at a time to aspirate and dispense liquid. This is the standard format and is ideal for lower-throughput work, such as preparing master mixes, transferring samples between individual tubes, or when working with a small number of samples.
Multichannel Pipettes Multichannel pipettes are designed for high-throughput applications. They feature a manifold that holds multiple shafts—most commonly 8 or 12, but also available in 4, 6, 16, or even more channels—allowing for the simultaneous aspiration and dispensing of liquid into multiple vessels. This design is perfectly suited for working with standard microplates (e.g., 96-well or 384-well plates), which have standardized spacing between wells.
The primary advantage of a multichannel pipette is a dramatic increase in efficiency and speed. For applications like ELISA, high-throughput screening (HTS), or setting up numerous PCR reactions, a multichannel pipette can reduce the time and number of steps required by a factor of 8 or 12. This not only accelerates the workflow but also significantly reduces the risk of human error and operator fatigue that can arise from repetitively pipetting into hundreds of individual wells.
However, there are considerations. Multichannel pipettes can be more challenging and time-consuming to calibrate, as ISO 8655 requires each individual channel to be tested and verified. Historically, they were also known for being heavy and unwieldy, though modern ergonomic designs have greatly improved their usability. Finally, the maximum volume per channel is typically lower than that of the largest single-channel pipettes.
3.4 Volume and Scale: Micropipettes vs. Macropipettes
Pipettes are also broadly categorized by the volume range they are designed to handle.
|
|
|


Micropipettes Micropipettes are precision instruments designed for handling micro-volumes, which are typically defined as volumes from 0.1 µL up to 1000 µL (or 1 mL). These are the most prevalent type of pipette in molecular biology, biochemistry, genetics, and clinical research labs. They come in various overlapping volume ranges, often designated by the maximum (nominal) volume in microliters, such as:
- P10: 0.5–10 µL
- P20: 2–20 µL
- P200: 20–200 µL
- P1000: 200–1000 µL
- P5000: 500–5000 µL (or 0.5-5 mL)
Macropipettes Macropipettes are used for transferring larger volumes of liquid, generally from 1 mL up to 10 mL, with some specialized models going as high as 50 mL. These instruments are essential for tasks like preparing large volumes of buffers, dispensing cell culture media, or making stock solutions in chemistry labs. This category includes both large-volume piston-driven pipettes and pipette controllers (also known as pipette aids or pipette pumps), which are motorized devices used in conjunction with classical serological pipettes to handle milliliter-scale volumes.
3.5 Classical Glass and Plastic Pipettes: A Guide to Foundational Tools
Before the advent of the piston-driven micropipette, a family of simpler glass and plastic pipettes formed the backbone of the laboratory. Many of these foundational tools remain essential for specific tasks today. They are typically used with a suction device, such as a rubber bulb or a motorized pipette controller, as mouth pipetting has been banned for safety reasons.
- Volumetric (Bulb) Pipettes: These are highly specialized glass pipettes, easily identified by a large bulb in the center. They are calibrated “To Deliver” (TD) a single, fixed volume with extremely high accuracy (e.g., 5.00 mL, 10.00 mL, 25.00 mL). Due to their exceptional precision, they are the gold standard in analytical chemistry for preparing standard solutions and performing titrations where volumetric accuracy is paramount.
- Serological Pipettes: These are graduated pipettes, meaning they have volume markings along their length, allowing for the transfer of variable volumes up to their maximum capacity (commonly 1 mL, 2 mL, 5 mL, 10 mL, 25 mL, and 50 mL). They are typically designated as “blow-out” pipettes, meaning the last drop of liquid must be expelled to deliver the full volume. Serological pipettes are indispensable in cell culture for sterile tasks like media changes and cell suspensions, as well as in microbiology and for preparing serial dilutions. They are available as reusable, autoclavable glass or, more commonly, as pre-sterilized, disposable plastic (polystyrene) for convenience and prevention of contamination.
- Pasteur (Transfer) Pipettes: These are the simplest form of pipette, essentially just a glass or plastic tube with a tapered tip and a separate rubber bulb for suction. They are not graduated and are used for rough, non-quantitative transfers of small liquid volumes, such as adding reagents dropwise, removing supernatants from a centrifuge tube, or transferring cell colonies.
- Graduated (Mohr) Pipettes: These are similar in appearance to serological pipettes, as they are also graduated tubes used for delivering variable volumes. However, they are calibrated differently. On a Mohr pipette, the graduation marks do not extend all the way to the tip. They are designed to dispense a specific volume by measuring the difference between a starting volume mark and an ending volume mark, and they are not “blow-out” pipettes.
Table 3.5: Overview of Classical Pipette Types
| Pipette Type | Common Material(s) | Calibration | Primary Use | Key Feature |
|---|---|---|---|---|
| Volumetric Pipette | Glass (Borosilicate) | Calibrated to deliver a single, highly accurate fixed volume (TD). | Preparing standard solutions, titrations, high-precision analytical chemistry. | Large central bulb; single graduation mark for extreme accuracy. |
| Serological Pipette | Plastic (Polystyrene), Glass | Graduated along the length for variable volume delivery; typically “blow-out”. | Cell culture (media transfer), microbiology, preparing serial dilutions. | Graduations extend to the tip; often sterile and disposable. |
| Pasteur (Transfer) Pipette | Plastic (Polypropylene), Glass | Ungraduated; not for quantitative measurement. | Rough transfer of small liquid volumes, adding reagents, removing supernatants. | Simple dropper-like design with a separate bulb. |
| Graduated (Mohr) Pipette | Glass | Graduated along the length for variable volume delivery; not “blow-out”. | General purpose variable volume dispensing, titrations. | Graduation marks stop before the tip; volume is measured by difference. |
4.0 Selecting the Right Pipette: A Professional’s Buying Guide
Choosing the right pipette is a critical decision that impacts experimental accuracy, efficiency, and user comfort. A systematic approach, considering the specific demands of the application, is essential. Before making a purchase, laboratory professionals should ask a series of key questions: What types of liquids will be handled? What is the required volume range? What level of accuracy and precision is necessary? What is the typical daily throughput?.
4.1 Matching the Pipette to the Application
The nature of the work is the first and most important consideration. A research lab performing novel experiments with varying protocols will benefit from the flexibility of adjustable-volume electronic pipettes. In contrast, a high-throughput clinical or quality control (QC) lab performing the same test repeatedly will prioritize speed, reliability, and error prevention, making fixed-volume or multichannel pipettes a more suitable choice.
4.2 The Nature of the Liquid: Handling Viscous, Volatile, and Hazardous Samples
As detailed previously, the physical properties of the sample liquid dictate the required pipetting technology. For routine work with aqueous solutions, a standard air-displacement pipette is sufficient and cost-effective. However, for any “problem” liquids—including viscous, volatile, dense, foaming, hot, cold, or hazardous materials—a positive-displacement pipette is the only choice to ensure accurate and safe handling. Using the wrong technology for these samples will inevitably lead to inaccurate results.
4.3 Volume, Accuracy, and Precision Requirements
Accuracy refers to how close a dispensed volume is to the set (true) value, while precision describes the consistency or reproducibility of multiple dispenses. Both are critical for reliable data. To maximize both, professionals should adhere to the “Golden Rule” of pipette selection: Always choose the smallest volume pipette that can comfortably handle the target volume.
This rule is based on the performance characteristics of adjustable-volume pipettes. These instruments are most accurate and precise when operated at or near their nominal (maximum) volume. As the set volume decreases, the relative error increases. The accuracy of an air-displacement pipette typically decreases significantly when it is used to measure volumes below 35% of its nominal capacity. For example, to pipette 15 µL, a P20 pipette (2-20 µL range) will yield far more accurate results than a P200 pipette (20-200 µL range) set to the same volume.
4.4 Ergonomics: Mitigating the Risk of Repetitive Strain Injury (RSI)
For any lab where technicians perform pipetting for extended periods, ergonomics is not a luxury—it is a critical factor for both personnel health and data quality. Repetitive Strain Injury (RSI) is a serious risk associated with manual pipetting. When selecting a pipette, especially a manual one, key ergonomic features to consider include:
- Lightweight design: A lighter pipette reduces muscle strain over a long day.
- Ergonomic grip: The handle should fit comfortably in the hand to promote a relaxed grip.
- Low plunger forces: The force required to depress the plunger to the first and second stops should be minimal.
- Light tip ejection forces: Ejecting tips can require significant force and is a major contributor to thumb strain. For high-volume workflows, an electronic pipette is the superior ergonomic choice, as it eliminates the most strenuous actions of plunging and tip ejection.
4.5 Fixed vs. Variable Volume: When to Choose Simplicity over Flexibility
The choice between a fixed-volume and a variable-volume pipette depends on the workflow’s nature.
- Variable-Volume Pipettes: These are the industry standard for research and development labs where protocols change frequently and a wide range of volumes are needed. Their flexibility is their key advantage.
- Fixed-Volume Pipettes: These instruments are set to dispense a single, non-adjustable volume. They are the ideal choice for dedicated, routine applications found in clinical, diagnostic, or QC environments. Their advantages are significant in these settings: they are faster to use (no time spent setting the volume), they eliminate a major source of error (the volume cannot be accidentally changed or mis-set), and they are often more robust and simpler to calibrate due to fewer moving parts.
4.6 Other Key Features to Consider
Beyond the primary criteria, several other features contribute to a pipette’s usability, safety, and reliability:
- Autoclavability: For applications requiring sterility, it is crucial to know if the pipette is fully autoclavable or if it must be disassembled first. Full autoclavability is a significant convenience and safety feature.
- Volume Lock: A secure volume-locking mechanism is essential on adjustable-volume pipettes to prevent inadvertent changes during use, which would compromise the entire experiment.
- Display Visibility: The volume display should be large, clear, and easy to read from a normal operating position to reduce the chance of setting errors.
- Tip Compatibility and Availability: As the pipette and tip form a system, it is vital to ensure a consistent and reliable supply of high-quality, manufacturer-recommended tips that are designed and tested for that specific pipette model.
5.0 Mastering Pipetting: Techniques for Accuracy and Precision
The most advanced pipette in the world will produce unreliable data if operated with poor technique. Mastering the art of pipetting is a fundamental skill for any laboratory professional. Consistent, deliberate, and correct technique is the key to minimizing error and ensuring the highest levels of accuracy and precision.
5.1 The Pillars of Proper Pipetting Technique
Decades of research and practice have refined a set of best practices that form the foundation of high-quality pipetting. Adhering to these steps consistently will dramatically improve results.
- Pre-wetting the Tip: Before aspirating the first sample for transfer, it is essential to pre-wet the pipette tip. This is done by aspirating the liquid to be transferred and then dispensing it back into the source container. This process should be repeated three to five times. Pre-wetting coats the interior surface of the tip and, more importantly, equilibrates the temperature and humidity of the air cushion inside the tip. This simple step significantly reduces the effects of evaporation and surface tension, leading to more consistent and accurate delivery, especially when working with volatile liquids or when the ambient temperature differs from the liquid’s temperature.
- Aspiration Angle and Depth: The pipette should always be held at a consistent angle. During aspiration, the ideal angle is as close to 90 degrees (vertical) as possible. The tip should be immersed just far enough below the liquid’s meniscus to allow for successful aspiration without drawing in air. A general guideline is an immersion depth of 2-3 mm for small volumes (e.g., <100 µL) and 5-6 mm for larger volumes (e.g., 1-5 mL). Immersing the tip too deeply can cause excess liquid to cling to the outside of the tip, leading to over-aspiration. Immersing it too shallowly risks aspirating air as the liquid level drops.
- Consistent Rhythm and Speed: All pipetting actions should be performed with a smooth, deliberate, and consistent rhythm. The plunger should be depressed and released smoothly, without any sudden or jerky movements. Never let the plunger “snap” up after aspiration, as this can cause liquid to splash up into the pipette shaft and leads to inaccurate volume uptake. Repeatable actions produce repeatable results.
- Pause After Aspiration: After releasing the plunger to aspirate the liquid, pause for at least one second with the tip still immersed in the source liquid. This brief pause allows the liquid to fully move into the tip and for the vacuum to stabilize, ensuring the correct volume is drawn. This is especially important with more viscous liquids.
- Dispensing Technique: To dispense, hold the pipette at a 45-degree angle and touch the end of the tip against the inner wall of the receiving vessel. Depress the plunger smoothly to the first stop. This “tip touch” or “touch off” technique uses surface tension to help pull the liquid out of the tip, ensuring a complete transfer.
- Using the Blow-out: After dispensing to the first stop, and while the tip is still touching the vessel wall, depress the plunger to the second stop (the blow-out). This action uses the remaining air in the cushion to expel the final droplet of liquid from the tip. The blow-out should be used for most air-displacement pipetting but may not be recommended for certain applications or pipette types, so manufacturer guidelines should always be consulted.
- Tip Management: To prevent cross-contamination, a fresh, new pipette tip must be used for each different sample or reagent. Reusing tips between different solutions is a major source of experimental error.
5.2 Forward vs. Reverse Pipetting
While the technique described above, known as forward or standard pipetting, is suitable for most applications, a different technique called reverse pipetting is recommended for handling problematic liquids.
- Forward (Standard) Pipetting: This is the standard technique: depress to the first stop to aspirate, and depress to the second stop (blow-out) to dispense. It is ideal for aqueous, non-viscous liquids.
- Reverse Pipetting: This technique is specifically designed to improve accuracy when working with viscous, foaming, or highly volatile liquids. The procedure is different:
- Depress the plunger all the way to the second stop (blow-out).
- Immerse the tip in the liquid and slowly release the plunger completely. This will aspirate a volume of liquid larger than the set volume.
- To dispense, press the plunger smoothly down to the first stop only. This will deliver the exact volume set on the pipette.
- A small amount of liquid will remain in the tip. This residual liquid should be discarded with the tip or returned to the source vessel. By aspirating an excess and then dispensing only the set volume, reverse pipetting compensates for the liquid that tends to cling to the tip wall (in the case of viscous liquids) or evaporate from the tip (in the case of volatile liquids), resulting in a more accurate delivery.
6.0 Troubleshooting: Common Pipetting Errors and How to Avoid Them
Even experienced professionals can encounter issues that compromise their results. Understanding the common pitfalls and their solutions is key to maintaining data integrity. Below is a practical troubleshooting guide for common pipetting problems.
Table 6.2: Common Pipetting Errors, Causes, and Solutions
| Error / Symptom | Probable Cause(s) | Corrective Action / Solution |
|---|---|---|
| Inaccurate or Inconsistent Volumes | 1. Improper pipetting technique (inconsistent speed, incorrect angles, snapping plunger). | 1. Re-train on proper technique. Use a smooth, consistent rhythm. Aspirate vertically (90°), dispense at 45° against the vessel wall. |
| 2. Pipette is out of calibration. | 2. Perform a user routine test. If it fails, send the pipette for professional calibration. | |
| 3. Using the wrong pipette for the volume (e.g., P1000 for 50 µL). | 3. Select the smallest pipette whose range includes the target volume. | |
| 4. Failure to pre-wet the tip, especially with volatile liquids. | 4. Pre-wet the tip 3-5 times with the sample liquid before the first transfer. | |
| Leaking Tip / Dripping Sample | 1. Poorly fitting or low-quality tip creating a bad seal. | 1. Use high-quality tips specifically recommended by the pipette manufacturer. Ensure the tip is seated firmly on the shaft. |
| 2. Pipetting volatile liquids (e.g., ethanol, acetone) with an air displacement pipette. | 2. Use a positive displacement pipette. If unavailable, use reverse pipetting technique and work quickly. | |
| 3. Damaged or dirty pipette shaft or piston. | 3. Clean the pipette according to manufacturer instructions. If damage is visible, send for repair. | |
| Air Bubbles in the Tip | 1. Tip immersed too shallowly, aspirating air from above the liquid surface. | 1. Ensure proper immersion depth (2-6 mm depending on volume) throughout the aspiration stroke. |
| 2. Aspiration is too rapid, especially with viscous liquids. | 2. Slow down the aspiration speed. Use reverse pipetting for viscous liquids. | |
| 3. Loose-fitting tip allowing air to be drawn in. | 3. Ensure the tip is seated correctly and is compatible with the pipette model. | |
| Sample Splashes Up into Pipette | 1. Letting the plunger “snap” up too quickly after aspiration. | 1. Release the plunger in a smooth, controlled manner. |
| 2. Lying the pipette down with liquid still in the tip. | 2. Always keep the pipette in a vertical position when there is liquid in the tip. Store vertically in a stand. | |
| 3. Over-aspiration by depressing the plunger to the second stop before aspiration. | 3. Only depress the plunger to the first stop for standard forward pipetting aspiration. | |
| Operation button sticks or fails to reset |
1. Foreign objects inside the pipette (such as liquid crystals, dust) causing blockage. | 1. Disassemble the pipette, remove internal foreign objects, rinse with alcohol and air dry. |
| 2. Spring aging, damage or jamming. | 2. Check spring condition, replace with new spring if aged, damaged or jammed. | |
| 3. Lack of maintenance over time, parts rusting or insufficient lubrication. Solutions: | 3. Perform regular maintenance, apply special lubricant (seal silicone grease) to moving parts. |
7.0 Pipette Maintenance, Calibration, and Care
A pipette is a precision instrument that requires regular care and maintenance to perform reliably over its lifespan. Neglecting maintenance is a direct path to inaccurate results and costly experimental failures. A comprehensive care program involves routine user maintenance, proper storage, and periodic professional calibration according to established standards.
7.1 The Importance of Routine Maintenance
Daily and weekly user maintenance practices are crucial for preventing contamination and ensuring the instrument remains in good working order.
- Daily Cleaning: The exterior of the pipette should be wiped down with a lint-free cloth and a 70% ethanol solution at the end of each day or after any spill. This minimizes surface contamination and prevents the transfer of contaminants between experiments.
- Regular Inspection: Users should regularly inspect their pipettes for any signs of physical damage, such as cracks in the handle, chips on the tip cone, or corrosion. The tip cone should be kept clean from any sample residue.
- Proper Storage: When not in use, pipettes must always be stored in a vertical position using a dedicated pipette stand or carousel. Storing a pipette horizontally on a lab bench allows any residual liquid or aerosols that may have entered the shaft to run deeper into the internal mechanism, causing corrosion and contamination.
7.2 Understanding Pipette Calibration: The ISO 8655 Standard
Calibration is the process of verifying that a pipette is dispensing the correct volume within specified tolerance limits. The globally recognized standard for this process is ISO 8655: Piston-operated volumetric apparatus. This standard provides a detailed framework to ensure that pipette measurements are accurate, precise, and traceable. Adherence to ISO 8655 is essential for any laboratory operating under quality management systems like GLP, GMP, or ISO 17025.
The most recent version, ISO 8655:2022, outlines several key requirements for a compliant calibration:
- Calibration Methodology: The primary method for calibration is gravimetric analysis, which involves repeatedly dispensing distilled water into a vessel on a high-precision balance and converting the measured mass to volume using a specific formula (the Z-factor) that accounts for water density and evaporation at the given temperature and pressure. The 2022 update also formally includes the photometric method as an alternative.
- Balance Requirements: The standard specifies the minimum performance requirements for the analytical balance used for calibration, based on the volume being tested. For example, calibrating a pipette with a nominal volume of less than 20 µL now requires a balance with a resolution of at least 0.001 mg (a six-place balance).
- Controlled Environment: To be valid, calibration must be performed in a strictly controlled environment. The temperature must be stable (between 15°C and 30°C, constant to ±0.5°C), the relative humidity must be above 50% to minimize evaporation, and the workspace must be free from drafts and vibration.
- Test Volumes and Replicates: For an adjustable-volume pipette, calibration must be tested at a minimum of three volumes: 100% of the nominal volume, 50% of the nominal volume, and 10% of the nominal volume (or the lowest volume in its range). A minimum of 10 replicate measurements must be taken at each volume.
- The Pipette-Tip System: As mentioned previously, a crucial update in the 2022 standard is the requirement that the pipette and its specific tip type be calibrated and treated as a single, inseparable system. A calibration is only valid for the exact tip model used during the test.
The stringent requirements of ISO 8655 are not arbitrary; they constitute a comprehensive risk management framework. Each element, from the balance specifications to the humidity control, is designed to minimize measurement uncertainty. For any laboratory, but especially those in regulated fields like clinical diagnostics or pharmaceutical development, an uncalibrated pipette represents a significant liability. It is a source of unknown error that can lead to failed experiments, incorrect patient results, or non-compliant product batches. Therefore, a rigorous calibration schedule is not merely a “best practice” but a fundamental strategy to mitigate the risk of generating invalid data and to ensure the integrity of all work performed.
7.3 User Routine Testing vs. Professional Calibration Services
 |
A complete pipette quality assurance program involves two distinct but complementary activities:
- Professional Calibration: This is a thorough service performed by an accredited calibration facility at regular intervals (typically every 3 to 12 months, depending on usage and risk assessment). The service provider performs the calibration according to ISO 8655 standards and provides a formal, traceable calibration certificate that documents the pipette’s performance and measurement uncertainty.
- Routine Testing (or Quick Check): This is a simplified performance check conducted by the pipette user in their own lab between professional calibrations (e.g., weekly or monthly). It serves as an interim verification to ensure the pipette has not drifted out of tolerance due to heavy use or accidental damage. A routine test can be as simple as pipetting a set volume onto an analytical balance 5-10 times to check the average accuracy and precision. This quick check provides confidence that the instrument continues to perform as expected on a day-to-day basis.
8.0 Pipettes in Action: Key Laboratory Applications
The principles and techniques of pipetting come to life in the context of real-world laboratory applications. Different fields rely on specific types of pipettes and techniques to achieve their scientific goals.
8.1 Molecular Biology
The field of molecular biology, which deals with the manipulation of DNA, RNA, and proteins, is critically dependent on high-precision micropipetting.
- PCR and qPCR: The Polymerase Chain Reaction (PCR) and its quantitative version (qPCR) are techniques used to amplify tiny amounts of DNA. These procedures require the precise addition of very small volumes of template DNA, primers, enzymes, and master mix into small tubes or wells. Adjustable-volume micropipettes in the P10, P20, and P200 ranges are essential for this work. For setting up many reactions at once in 96-well plates, multichannel pipettes are the tool of choice to ensure speed and consistency.
- Nucleic Acid Handling: DNA and RNA are precious samples that are highly susceptible to contamination. Therefore, when working with nucleic acids, it is standard practice to use filter (barrier) tips to prevent aerosol contamination of the pipette itself. For particularly difficult samples or to ensure maximum sample recovery, positive displacement pipettes are also recommended.
8.2 Cell Culture
Cell culture, the process of growing cells outside of their natural environment, requires strict aseptic (sterile) technique to prevent microbial contamination.
- Aseptic Liquid Handling: Large-volume sterile liquids, such as growth media and buffers, are handled using serological pipettes in conjunction with a motorized pipette controller (e.g., Corning Stripettor, Sartorius Midi Plus). This combination allows for the controlled, sterile transfer of liquids for tasks like feeding cells, passaging (splitting) cell cultures, and adding reagents to flasks or plates. Disposable, pre-sterilized plastic serological pipettes are the standard in this field to eliminate any risk of cross-contamination.
- Cell Seeding and Assays: When preparing multi-well plates for cell-based assays, it is crucial to dispense an equal number of cells into each well. Electronic and multichannel pipettes are invaluable for this task. Their consistency ensures an even cell distribution, which improves the reproducibility and reliability of the assay results.
8.3 Analytical Chemistry, Drug Discovery, and Clinical Diagnostics
These fields rely on quantitative accuracy for everything from determining the concentration of a chemical to diagnosing a disease.
- Analytical Chemistry: For applications requiring the highest level of accuracy, such as preparing chemical standards for calibration curves or performing volumetric titrations, the glass volumetric (bulb) pipette remains the unparalleled instrument of choice.
- Drug Discovery: The drug discovery process often involves high-throughput screening (HTS), where thousands of compounds are tested against a biological target. This work is heavily reliant on electronic and multichannel pipettes to rapidly and accurately dispense reagents and compounds into hundreds or thousands of microplate wells.
- Clinical Diagnostics: Pipettes are at the heart of countless clinical tests, including ELISA (Enzyme-Linked Immunosorbent Assay), hematology, and urinalysis. In routine diagnostic settings where the same volume is pipetted repeatedly for patient samples, fixed-volume pipettes are often preferred. Their simplicity and inability to be mis-set reduce the potential for human error, which is critical when patient health depends on the result.
If you are ready to find the right Pipette for your laboratory, please browse our complete product range: Pipette
This guide is maintained by HINOTEK’s core technical team, comprised of senior engineers and application scientists with over two decades of hands-on experience in fields such as microscopy, centrifugation, and spectrophotometry. We are committed to ensuring that every piece of information in this guide—from instrument principles and technical specifications to laboratory procurement advice—maintains the highest level of accuracy and timeliness.
This content is regularly reviewed and updated to reflect the latest industry standards and technological advancements. We value feedback from the global scientific community. Should you have any questions or suggestions, or wish to discuss any technical details, please do not hesitate to contact our expert team at [email protected].