1. Introduction: The Cornerstone of Microscopic Anatomy
In the vast landscape of scientific and medical laboratories, certain instruments stand out not just for their complexity, but for their fundamental role in enabling discovery. The microtome is one such instrument. It is the cornerstone of histology, pathology, and numerous research disciplines, serving a single, critical purpose: to slice material into sections so thin they can be illuminated and observed under a microscope. This guide provides an exhaustive exploration of the microtome, focusing on the most prevalent type—the rotary microtome—and the intricate techniques that transform a simple piece of tissue into a window to the cellular world.
Defining the Microtome: The Precision Instrument for Ultra-Thin Sectioning
|
|

A microtome is a specialized cutting instrument engineered to produce exceptionally thin slices of material, known as “sections”. The name itself, derived from the Greek words mikros (meaning “small”) and temnein (meaning “to cut”), perfectly encapsulates its function. These sections are often just a few micrometers (μm) thick, a scale difficult to comprehend. For perspective, a typical section for light microscopy is about 4-5 μm, while a human hair is roughly 70 μm in diameter. Some advanced microtomes can produce sections as thin as 50 nanometers (nm), making it possible to slice a single hair across its breadth multiple times.
|
|
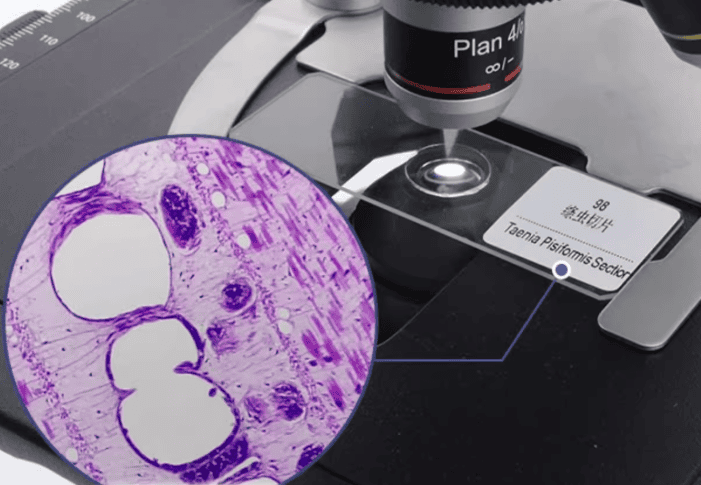
The process of creating these sections is called microtomy or microsectioning. The resulting sections, whether from biological tissue, bone, or even industrial materials, are typically mounted on glass slides, stained to reveal specific structures, and examined under a light or electron microscope. The scientific discipline dedicated to the study of these microscopic tissue structures is known as histology.
The Critical Role of Microtomy in Histology, Pathology, and Research
The ability to create high-quality, uniform sections is not a mere technical exercise; it is fundamental to diagnostic medicine and scientific research. The quality of a microtome section directly influences the clarity of the microscopic image and, consequently, the accuracy of any analysis or diagnosis derived from it.
- In Diagnostic Pathology: Microtomy is the bedrock of cancer diagnosis. Pathologists examine tissue sections to identify abnormal cellular arrangements, growth patterns, and other indicators of malignancy, infection, or inflammation. An accurate diagnosis, which dictates a patient’s treatment plan, is critically dependent on a clear, well-prepared tissue section.
- In Scientific Research: Microtomy allows scientists to probe the intricate details of cellular and subcellular architecture. Researchers in fields as diverse as neuroscience, cell biology, and molecular genetics rely on microtomes to prepare samples for study. For instance, precision-cut kidney slices are used to investigate renal function and the effects of new drugs, while neuroscientists study brain slices to understand neural circuits.
- In Other Fields: The utility of the microtome extends beyond biology and medicine. It is an essential tool in forensic science for examining tissue evidence, in materials science for analyzing the structure of plastics and polymers, and in botany for studying plant tissues.
A Glimpse into the History: From Hand-Cut Slices to Automated Precision
The sophisticated microtomes of today are the result of centuries of innovation, driven by the relentless scientific pursuit of seeing the unseen. Before the invention of these devices, researchers laboriously cut sections by hand using simple razor blades—a method that lacked precision and reproducibility.
The journey toward mechanical precision began in 1770 with a device invented by George Adams, Jr., and later refined by Alexander Cummings. A significant advancement came in 1835 when Andrew Prichard developed a table-based model designed to isolate the instrument from the operator’s vibrations, a crucial step toward creating thinner, more uniform sections.
However, the anatomist Wilhelm His, Sr. is often celebrated for his 1865 invention, a microtome that enabled the creation of unbroken, sequential sections. This was a monumental breakthrough, particularly for embryology, as it allowed for the three-dimensional reconstruction of developing structures from a series of two-dimensional slices. The rotary microtome, which would become the most common design in modern laboratories, was developed by the American embryologist Charles Sedgwick Minot around 1885-86, solidifying the foundation for modern histological practice.
This historical progression reveals that the microtome is not merely a tool but a foundational enabling technology. Its evolution did not happen in a vacuum; it was driven by, and in turn drove, major advancements in microscopy and cellular biology. As microscopes became more powerful, the bottleneck in scientific discovery shifted to sample preparation. Scientists needed thinner and more consistent sections to fully leverage the increased resolving power of their new optical instruments. Therefore, the history of the microtome is a story of overcoming the physical limitations of biological samples to unlock new frontiers of observation. For any laboratory today, the choice of a microtome is a direct investment in the quality and potential of the data it can generate.
2. The Microtome Family: An Overview of Key Instrument Types
While the rotary microtome is the most common workhorse in histology labs, it is part of a larger family of instruments, each designed to solve a specific set of challenges. The choice of microtome is dictated by the sample’s physical properties—its size, hardness, and preparation state (e.g., fresh, frozen, or embedded)—as well as the requirements of the downstream application.
The diversity of microtome types reflects a fundamental principle in materials science and engineering: the cutting method must be precisely adapted to the material’s properties. There is no universal solution. Soft, delicate tissue requires a cutting method that imparts minimal pressure to avoid distortion, while hard materials demand a robust and powerful cutting action. This understanding helps explain why a well-equipped laboratory might require several different types of microtomes to handle its diverse workload.
- The Rotary Microtome: As the primary focus of this guide, the rotary microtome is the most common and versatile type used for sectioning paraffin-embedded tissues in routine histology and pathology labs. Its design provides excellent stability and allows for the rapid production of serial sections.
- The Sliding (or Sledge) Microtome: This instrument is designed for sectioning very large tissue blocks or particularly hard materials like wood, bone, and large paraffin-embedded specimens. In this design, the specimen is held in a fixed position while the knife moves back and forth across it on a sledge or slide.
- The Vibrating Microtome (Vibratome): This microtome uses a vibrating blade to cut through soft, unfixed tissues without the need for freezing or embedding. The high-frequency vibration minimizes pressure and cellular distortion, making it indispensable for applications in neuroscience and electrophysiology where preserving cell morphology and viability is critical.
- The Cryostat (Cryo-microtome): A cryostat is essentially a rotary microtome housed within a refrigerated chamber, typically maintained at temperatures between −20°C and −30°C.6 It is used for sectioning frozen tissue. This technique is vital for rapid intra-operative diagnosis, where a surgeon may need a pathologist’s immediate assessment of a tissue sample (e.g., a tumor margin) during a surgical procedure.
- The Saw Microtome: For extremely hard and brittle materials such as bone, teeth, and ceramics, the saw microtome is the instrument of choice. It often employs a diamond-tipped spinning blade, which may be cooled by a water jet to prevent overheating during cutting.
- The Ultramicrotome: This is a highly specialized instrument capable of producing “ultra-thin” sections, typically between 60 and 100 nm thick, for examination with a transmission electron microscope (TEM). To achieve such incredible thinness, ultramicrotomes use extremely sharp glass or gem-quality diamond knives.
- The Laser Microtome: Representing a modern, non-contact approach to sectioning, the laser microtome uses a high-power femtosecond laser to cut sections without a physical blade. This method eliminates mechanical stress and artifacts, allowing tissues to be sectioned in their native state without prior processing or embedding.
3. Deep Dive: The Rotary Microtome
The rotary microtome is the undisputed workhorse of the modern histology and pathology laboratory. Its combination of precision, stability, and efficiency makes it ideal for the routine task of sectioning paraffin-embedded tissue blocks. Understanding its mechanics, components, and operational nuances is essential for any laboratory professional.
3.1. The Mechanical Heart: How a Rotary Microtome Works
The rotary microtome’s design is a marvel of mechanical engineering, translating a simple rotational motion into the precise, repetitive action required for creating uniform sections.
The Principle of Rotational Action: Handwheel, Vertical Stroke, and Sectioning
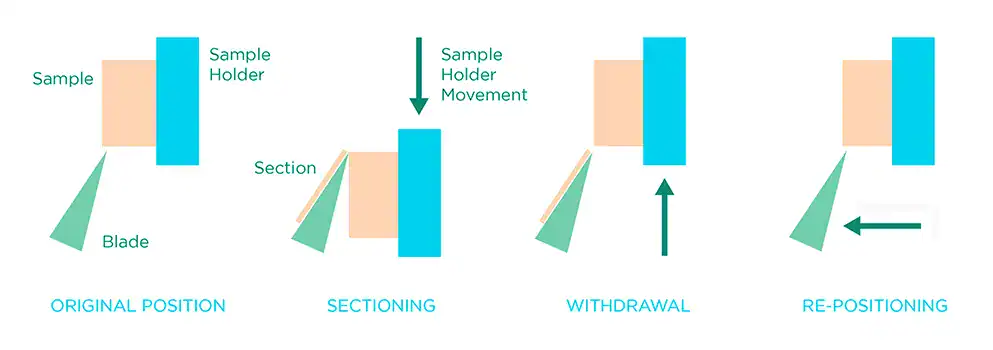 |
The operation of a rotary microtome is driven by the manual rotation of a large, balanced handwheel. A single, complete 360-degree turn of this handwheel actuates one full cutting cycle. During this cycle, the specimen block holder, which holds the paraffin block, moves in a precise vertical path—down and then up—past a stationary, horizontally fixed knife. The actual cutting of the section occurs during the downward stroke of the block holder. The continuous, smooth rotation of the handwheel allows the operator to generate a continuous “ribbon” of serial paraffin sections, which is essential for studying tissue structures in sequence.
The Specimen Advancement Mechanism: From Classic Pawl-and-Ratchet to Modern Stepper Motors
The genius of the microtome lies in its feed mechanism, which automatically advances the specimen block toward the knife by a precise, user-defined thickness after each cutting cycle. This incremental advance is what allows for the creation of sequential sections. The evolution of this mechanism represents the most significant technological leap in rotary microtomy, directly impacting the instrument’s precision, reproducibility, and longevity.
- Classic Pawl-and-Ratchet Mechanism: Historically, and in simpler manual models, this advance was achieved through a purely mechanical system known as a pawl and ratchet wheel. With each rotation of the handwheel, a small, spring-loaded lever called a pawl engages a tooth on the ratchet wheel. This action incrementally turns the ratchet wheel, which is connected to a fine-threaded micrometer screw. The rotation of the screw pushes the entire specimen holder assembly forward by a tiny, fixed amount. While ingenious and effective, this mechanical system is subject to wear over time. The gradual erosion of the pawl or the ratchet teeth can lead to inconsistencies in the feed distance, resulting in a common and frustrating artifact known as “thick and thin sections”.
- Modern Stepper Motor Mechanism: Modern semi-automatic and fully automatic microtomes have largely replaced this mechanical system with a high-precision stepper motor. This motor is coupled to precision screw rods and guided by stable cross-roller bearings. The advancement of the block is controlled digitally, with the motor executing a precise number of steps to move the block forward by the exact distance selected by the user. This motorized system offers vastly superior precision, consistency, and durability because it eliminates the primary source of mechanical wear and imprecision found in the older design. This shift from mechanical to electro-mechanical control is not just about convenience; it is a fundamental improvement in the instrument’s ability to generate reliable and reproducible scientific data.
The Retraction Function: Protecting the Blade and the Block
Another critical feature of most modern rotary microtomes is the retraction mechanism. During the upward return stroke of the cutting cycle, this mechanism pulls the specimen holder back by a very small distance (e.g., a few micrometers). This action moves the face of the paraffin block away from the knife edge as it returns to the starting position. This seemingly minor movement is incredibly important for two reasons:
- It prevents the delicate tissue on the block face from scraping against the sharp blade edge on the non-cutting return stroke, thus avoiding damage to the sample.
- It protects the blade edge from unnecessary contact and wear, significantly prolonging its usable life.
3.2. Anatomy of a Rotary Microtome: A Component-by-Component Breakdown
|
|

A rotary microtome is an assembly of precision-engineered parts, each with a specific function. Familiarity with these components is essential for proper operation, adjustment, and maintenance.
- The Foundation: Base and Housing: The instrument is built on a heavy, rigid base, typically made of cast metal. This mass is crucial for providing stability and damping vibrations during the cutting process, which is essential for producing smooth, uniform sections. The outer housing protects the delicate internal advancement and drive mechanisms from contamination by paraffin debris, dust, and spilled liquids.
- Specimen Clamping: The Cassette Clamp / Block Holder: This is the component that securely grips the paraffin block, which is typically housed in a plastic cassette. The clamp is mounted on an adjustable head that allows the operator to precisely orient the block in multiple directions (X/Y axes). This orientation capability is critical for aligning the tissue surface perfectly parallel to the knife’s cutting edge. Advanced models may feature visual aids like pointers or bubble levels to help achieve precise and repeatable orientation across multiple blocks.
- The Cutting Engine: The Knife Holder Assembly: This robust assembly holds the cutting blade and allows for its precise positioning. It consists of several key parts:
|
|
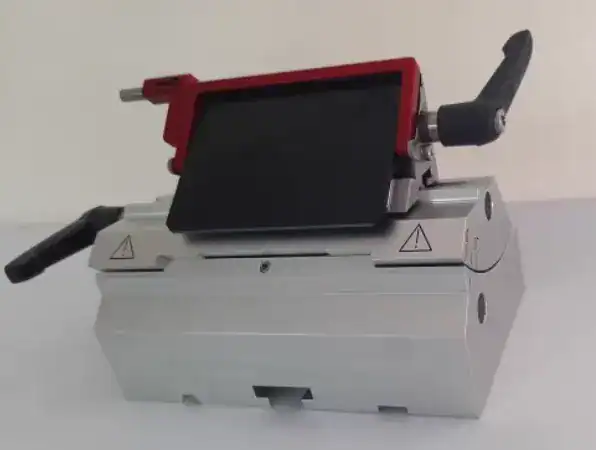
- Knife Holder Base: This part sits on rails on the microtome stage and anchors the entire knife assembly. It can be moved forward or backward to set the distance to the block but must be firmly locked in place during sectioning.
- Blade Clamp: A secure clamp that holds either a disposable blade or, in older models, a reusable steel knife.
- Angle of Tilt Adjustment (Clearance Angle): This is a lever or knob that allows the user to adjust the tilt of the blade. Setting the correct clearance angle is arguably the single most important adjustment for achieving high-quality sections and is discussed in detail later.
- Face Plate: A small plate positioned in front of the blade that helps to prevent the newly cut ribbon from curling up and instead guides it down and away from the blade toward the operator.
- User Controls: Handwheels and Thickness Gauge:
- Advancement Handwheel (Main Handwheel): The large, counterbalanced wheel that the operator turns to cycle the microtome. Its weight and balance are engineered for smooth, effortless rotation to minimize operator fatigue and ensure a consistent cutting motion.
- Coarse Feed Wheel: A separate, smaller wheel or knob used to move the block holder rapidly over large distances. It is used for setting the initial gap between the block and the knife or for retracting the block fully.
- Thickness Gauge (Micron Adjustment): A control, which can be a mechanical dial or a digital display on modern units, that allows the operator to set the desired thickness for each section. On most rotary microtomes, this can be adjusted in increments, typically from 0.5 μm to 60 μm.
- Safety and Convenience Features:
- Handwheel Lock: A crucial safety feature, this is a lever or button that locks the handwheel, preventing it from rotating. It is typically engaged with the specimen holder in its highest position, creating a safe space for the operator to insert or remove a block, or to adjust or change the blade. Advanced models may feature locks that can be engaged in any position or automatic electronic brakes that activate when sectioning is paused.
- Knife Guard: A physical shield that can be positioned over the exposed edge of the blade. This simple device provides critical protection against accidental cuts when the operator is working near the blade.
- Waste Tray: A large, removable tray that surrounds the front of the microtome base to collect paraffin trimmings and discarded section ribbons. This makes cleanup quick and easy and helps keep the work area tidy.
4. The Paraffin Technique: A Complete Workflow
A perfect section is not solely the product of a high-quality microtome; it is the culmination of a meticulous, multi-step process known as the paraffin technique. The microtome is the final, critical instrument in a chain of procedures, and its performance is entirely dependent on the quality of the steps that precede it. This illustrates the “Garbage In, Garbage Out” principle of histology: a failure at any point in the workflow will compromise the final result. Understanding this entire process is key to mastering microtomy and troubleshooting problems effectively.
4.1. Preparing the Specimen: From Tissue to Block
The journey from a fresh tissue specimen to a solid paraffin block ready for sectioning involves several crucial chemical and physical transformations. The goal of these pre-analytical steps is to preserve the tissue’s structure and provide it with the rigidity needed to withstand the sectioning process.
-
- Step 1: Fixation: Immediately after removal from the source, the tissue specimen is immersed in a chemical fixative. The most common fixative for routine histology is 10% neutral buffered formalin. Fixation serves two primary purposes: it prevents autolysis (the breakdown of tissue by its own enzymes) and putrefaction (breakdown by bacteria), and it cross-links proteins, which hardens the tissue and preserves its cellular and structural integrity. Inadequate or delayed fixation is a primary source of many sectioning artifacts, as poorly preserved tissue will not respond well to subsequent processing steps.
|
|

- Step 2: Processing (Dehydration, Clearing, and Infiltration): Paraffin wax is hydrophobic (immiscible with water), and biological tissue is mostly water. Therefore, all the water must be removed from the fixed tissue before it can be embedded in wax. This is achieved through a three-stage process, typically performed in an automated tissue processor:
- Dehydration: The tissue is passed through a series of alcohol solutions of increasing concentration (e.g., 70%, 95%, 100% ethanol). This gradually removes the water from the tissue without causing excessive cellular distortion.
- Clearing: After dehydration, the tissue is placed in an intermediate solvent, known as a clearing agent (most commonly xylene), which is miscible with both alcohol and paraffin wax. This step removes the alcohol and makes the tissue translucent (hence “clearing”).
- Infiltration: Finally, the tissue is immersed in multiple baths of molten paraffin wax (typically at around 60$°C$). The hot wax infiltrates the tissue, completely replacing the clearing agent.
|
|

- Step 3: Embedding: Once fully infiltrated, the tissue is carefully removed from the processor and placed into a small mold (often the base of a histology cassette). The technician orients the tissue precisely within the mold to ensure that the correct plane will be sectioned. The mold is then filled with more molten paraffin and placed on a cold plate to solidify rapidly. The result is a solid paraffin block, with the tissue specimen firmly supported and encased within the wax. This block now has the necessary mechanical strength and stability to be clamped into the microtome and cut into thin slices.
4.2. The Art of Sectioning: A Step-by-Step Guide
With a well-prepared paraffin block, the histotechnologist can now proceed to the microtome. This stage is often described as an art, requiring a steady hand, patience, and a deep understanding of the interplay between the block, the blade, and the instrument.
-
- Step 1: Trimming (or “Facing”) the Block: The paraffin block is first locked securely into the microtome’s specimen clamp. Before any usable sections can be cut, the excess paraffin on the surface of the block must be trimmed away to expose the tissue. This process, known as “facing” or “roughing,” is done by setting the microtome to a thick cutting depth (e.g., 10-30 μm) and making several passes until a full, representative surface of the tissue is visible. For best results, the block should be thoroughly chilled on a cold plate or a tray of ice before and during this process. A cold, firm block provides more uniform support for the tissue and is easier to section cleanly.
- Step 2: Creating the Perfect Ribbon: Once the block is faced, the section thickness is adjusted to the desired value for final sectioning, typically 4-5 μm for routine light microscopy. Using a smooth, steady, and consistent rhythm while turning the handwheel, the operator begins to cut. As each section is cut, the heat and pressure of the blade edge cause it to adhere slightly to the section that preceded it, forming a continuous ribbon of serial sections. A pair of fine-tipped forceps or a soft brush is used to gently guide the leading edge of the ribbon away from the blade as it forms.
- Step 3: Floating Sections on the Water Bath: The delicate ribbon of sections is then carefully transferred to the surface of a warm water bath, which is maintained at a temperature just below the melting point of the paraffin wax (typically 40-45$°C$). The warmth of the water allows the sections, which are always slightly compressed during cutting, to relax and flatten out. This critical step removes any minor wrinkles or folds, ensuring the section will be perfectly flat when mounted.

KD-H Slider Warmer
- Step 4: Mounting Sections onto Microscope Slides: After a few moments on the water bath, a clean, labeled glass microscope slide is brought into the water at a shallow angle. The operator carefully maneuvers the slide underneath a desired floating section and slowly withdraws it from the water, “fishing” the section out and capturing it flat against the glass surface. The slide is then placed vertically in a slide rack to allow all the water to drain away. Finally, the rack of slides is placed in a low-temperature oven (e.g., 37$°C$ overnight) or on a slide warmer to dry completely and adhere the section firmly to the glass before it proceeds to the staining stage.
5. Optimizing for Precision: Key Technical Considerations
Achieving consistently high-quality sections requires more than just following the steps; it demands an understanding of the technical nuances that separate a novice from an expert. These considerations, particularly the blade angle and the choice of automation, have a profound impact on the final result.
5.1. The Critical Importance of the Clearance Angle
Of all the user-adjustable settings on a rotary microtome, none is more critical to success than the clearance angle. An incorrectly set angle is the source of a vast number of sectioning artifacts.
Defining the Angles: Clearance, Bevel, and Rake
To understand the clearance angle, one must first visualize the geometry of the blade edge. Three angles are significant:
- Bevel Angle: This is the intrinsic angle formed by the two sharpened facets that meet to create the cutting edge of the blade. This angle is determined by the manufacturer. A wider bevel angle creates a stronger, more robust edge suitable for harder tissues, while a narrower bevel angle creates a sharper but more delicate edge for finer sectioning.
- Clearance Angle: This is the angle between the surface of the block face and the lower cutting facet of the blade. This is the angle that the operator sets using the adjustment on the knife holder. For most paraffin sectioning, the optimal clearance angle is between 3 and 8 degrees.
- Rake Angle: This is the angle between the upper cutting facet of the blade and a line drawn perpendicular to the block face. The rake angle and clearance angle are inversely related; increasing one decreases the other.
Consequences of an Incorrect Angle
Setting the clearance angle is a balancing act. The goal is to have the blade slice cleanly through the block with minimal friction or compression.
- Angle Too Shallow (Too Small): If the clearance angle is too small, the “heel” or bottom facet of the blade will rub against the face of the block on the cutting stroke instead of clearing it. This friction causes significant compression and is a common cause of artifacts such as alternating thick and thin sections, skipped sections (where the block is compressed on one stroke and no section is cut, then a thick section is cut on the next), and jammed or wrinkled sections.
- Angle Too Steep (Too Large): If the clearance angle is too large, the blade attacks the block too aggressively. This causes the section to be bent very sharply as it is separated from the block, inducing stress and vibration. This is a primary cause of chatter (microscopic vibrations that appear as fine lines across the section), an artifact known as “Venetian blinds” (thicker, regular waves), and sections that are overly compressed or roll up tightly instead of forming a flat ribbon.
A Practical Guide to Setting the Optimal Angle
It is important to recognize that the degree markings on the knife holder are reference points, not absolute angle measurements. The true, effective clearance angle is a function of both the holder’s setting and the blade’s intrinsic bevel angle. Therefore, the optimal setting must often be found empirically.
A reliable method is to start with the manufacturer’s recommendation (e.g., 5 degrees) as a baseline. If artifacts are present, adjust systematically. A common best practice is to start with a steeper angle (e.g., 10 on the reference scale) and attempt to section. If chatter or compression occurs, lower the angle by one mark at a time, cutting a few sections after each adjustment. Continue this process until a smooth, uncompressed, and artifact-free ribbon is consistently produced. The ideal angle is the lowest possible setting that avoids the friction and compression artifacts associated with a too-shallow angle.
5.2. Manual vs. Semi-Automatic vs. Fully Automatic: Choosing Your Level of Control
The choice between a manual, semi-automatic, or fully automatic rotary microtome is a strategic decision that directly impacts a laboratory’s workflow, consistency, and ergonomics. This decision involves balancing three key factors: Cost (initial investment), Control (the level of tactile feedback and manual intervention), and Consistency/Throughput (the ability to produce uniform results efficiently). The “best” choice is entirely dependent on the specific needs, budget, and workload of the laboratory.
- Manual Rotary Microtome: In a fully manual instrument, the operator’s actions drive everything. Turning the handwheel provides the force for the cutting stroke and simultaneously engages the mechanical feed mechanism to advance the block.
- Benefits: These are the most affordable models and offer the maximum level of tactile control. Some highly experienced histotechnologists prefer manual microtomes for the direct feedback they provide, allowing them to “feel” the tissue as it is being cut and make subtle adjustments in speed and pressure.
- Drawbacks: They place a high physical demand on the operator, and consistency can vary between different users or even with the same user over a long day. They have the lowest throughput, making them less suitable for high-volume labs.
- Semi-Automatic Rotary Microtome: This type represents a hybrid approach. It features a motorized specimen feed, ensuring that the block advances by a precise, consistent amount with each cycle. However, the operator still provides the power for the cutting stroke by turning the handwheel manually.
- Benefits: This design offers an excellent balance of features. The motorized feed provides superior consistency and reproducibility in section thickness, which is critical for research and diagnostics. It also reduces the physical strain associated with some manual models and is particularly effective for sectioning hard or dense tissues where a consistent cutting force is beneficial.
- Drawbacks: They are more expensive than manual models and still require the repetitive manual action of turning the handwheel.
- Fully Automatic Rotary Microtome: In a fully automatic microtome, both the specimen feed and the cutting stroke are motorized. The operator can initiate and perform sectioning simply by pressing a button or a foot pedal.
- Benefits: These models offer the highest level of throughput and consistency, making them ideal for busy, high-volume laboratories. By removing the operator from the cutting motion, they ensure that every section is cut at the same speed and force, maximizing reproducibility between users. They also offer the best ergonomics, significantly reducing the risk of repetitive strain injuries (RSI) associated with manual microtomy.
- Drawbacks: They are the most expensive option. While most models offer a manual mode, some users may feel a loss of the direct tactile feedback experienced with manual cutting.
To aid in this decision, the following table summarizes the key differences:
| Feature/Consideration | Manual Microtome (Such as HINOTEK KD-2260) |
Semi-Automatic Microtome (Such as HINOTEK KD-3358) |
Fully Automatic Microtome (Such as HINOTEK KD-3368AM) |
| Specimen Feed | Manual (via Handwheel) | Motorized | Motorized |
| Cutting Stroke | Manual (Handwheel) | Manual (Handwheel) | Motorized |
| Throughput | Low | Medium | High |
| Consistency | Operator-dependent | High (for thickness) | Very High (for thickness & speed) |
| User Control | Maximum tactile control | High control with automated precision | High control (with manual override) |
| Ergonomics | High repetitive strain | Reduced strain | Minimal repetitive strain |
| Ideal Use Case | Low-volume labs, teaching, tasks requiring nuanced control | Routine clinical labs, hard tissues, research labs balancing cost and consistency | High-throughput clinical/research labs, studies requiring maximum reproducibility |
6. Troubleshooting Common Microtomy Artifacts: A Practical Guide
Even with the best equipment and technique, artifacts can and do occur during microtomy. A skilled histotechnologist is adept at identifying these problems and systematically troubleshooting their cause. The following is a practical guide to some of the most common artifacts, their likely causes, and potential remedies.
- Problem: Crooked or Curved Ribbons
- Description: The ribbon does not come off straight but curves to one side, forming a “C” shape.
- Causes: The top and bottom horizontal edges of the block are not parallel to each other; the block face is not parallel to the knife edge; there is a dull spot on one side of the blade causing uneven compression; the tissue within the block has varying density.
- Solution: Carefully re-trim the block with a razor blade to ensure the leading and trailing edges are perfectly parallel. Re-orient the block holder to align it with the knife. Move the blade to a fresh, sharp area or replace it entirely.
- Problem: Compressed, Wrinkled, or Jammed Sections
- Description: Sections appear smaller or shorter than the block face and may have fine wrinkles or bunch up against the blade.
- Causes: A dull blade is the most common cause. Other factors include cutting too rapidly, a blade gummed with paraffin debris, a room that is too warm causing the wax to soften, or a clearance angle that is too small (causing compression) or too large (causing chatter).
- Solution: Change or move the blade to a new position. Clean the blade and holder with a soft brush and xylene substitute. Slow down the cutting speed to a smooth, steady pace. If the room is warm, chill the block thoroughly on ice. Adjust the clearance angle up or down as needed.
- Problem: Alternating Thick and Thin Sections
- Description: When floated on the water bath, sections in the ribbon are visibly different in thickness and opacity.
- Causes: This is often a mechanical issue. The block holder or knife holder may be loose. It can also be caused by a clearance angle that is too shallow, causing the block to be compressed on one stroke and then spring back to cut a thick section on the next. Soft wax can also contribute.
- Solution: Systematically check and tighten all locking levers and clamps on the microtome, especially the block clamp and the knife holder base. Increase the clearance angle slightly. Ensure the block is well-chilled to firm up the wax.
- Problem: Holes in the Section
- Description: Small, irregular holes appear within the tissue section.
- Causes: Overly aggressive trimming (“facing”) can pluck out small, brittle pieces of tissue. Air bubbles trapped in the block during embedding will appear as holes. Hard particles within the tissue, such as calcium deposits, staples, or sutures, can also cause this.
- Solution: Face the block more gently, using smaller micron advances. If air bubbles are suspected, the tissue may need to be re-melted and re-embedded. For brittle tissue, soaking the faced block on a wet piece of gauze on an ice tray can help rehydrate and soften it.
- Problem: Lengthwise Scratches or Splits (Knife Lines)
- Description: A fine, straight line or tear runs vertically through the entire ribbon.
- Causes: The most common cause is a nick or defect in the blade edge. It can also be caused by a hard particle (like calcium) embedded in the block that has damaged the blade, or by paraffin debris that has become stuck to the blade edge.
- Solution: Immediately move the blade laterally to an unused, undamaged area. If the entire blade is damaged, replace it. Carefully clean the blade edge with a soft brush to remove any adhering debris.
- Problem: Chatter or Microscopic Vibration (“Washboarding”)
- Description: Sections have microscopic, parallel lines or a “washboard” pattern running across them, perpendicular to the direction of cutting.
- Causes: This vibration artifact is often caused by a clearance angle that is too large. Other causes include a dull blade, cutting too fast, or the tissue itself being too hard (e.g., over-fixed or over-dehydrated). Loose clamping of the block or blade can also induce vibration.
- Solution: Decrease the clearance angle. Tighten all clamps securely. Use a fresh blade. Slow down the cutting rhythm. If the tissue is excessively hard, try soaking the block face with a softening agent to restore some moisture.
7. Selecting the Right Rotary Microtome for Your Laboratory
Choosing the right rotary microtome is a significant investment that impacts a laboratory’s efficiency, the quality of its results, and the well-being of its staff. The decision should be guided by a careful assessment of the lab’s specific needs and applications. The following factors provide a framework for making an informed choice.
- Application & Throughput: The first question to ask is: what kind of work will the microtome be doing? A research lab sectioning a few precious blocks a day has very different needs from a high-volume clinical pathology lab processing hundreds of blocks daily. The required throughput is the primary determinant in the choice between manual, semi-automatic, and fully automatic models.
- Precision & Reproducibility: For applications like quantitative analysis in research or in clinical trials where consistency is paramount, a microtome with a motorized feed (semi- or fully automatic) is highly recommended. Motorized systems eliminate the operator-induced variability in section thickness, leading to more reliable and reproducible data.
- Ergonomics & Safety: The health and safety of laboratory personnel are critical. Microtomy involves repetitive motions and work with extremely sharp blades. Look for ergonomic features like a smoothly rotating, balanced handwheel and comfortable controls to minimize the risk of repetitive strain injury. Robust safety features are non-negotiable. These include a secure handwheel lock that is easy to engage, an effective knife guard to protect from cuts, and, on automated models, an emergency stop button.
- Key Technical Specifications: Ensure the instrument’s specifications match your needs. Check for an adequate vertical stroke length (typically 60-70 mm) to accommodate the height of your largest blocks and a sufficient horizontal feed range (typically around 28 mm). A specimen retraction feature is a standard and essential function on any modern microtome and should be considered a mandatory requirement.
- Ease of Maintenance & Cleaning: A microtome is a precision instrument that requires regular care to maintain its performance. Look for design features that facilitate easy cleaning, such as a large, easily removable waste tray and a durable, solvent-resistant housing. A well-maintained instrument will provide years of reliable service.
8. Conclusion: Advancing Science, One Section at a Time
The rotary microtome is far more than a simple cutting device; it is a precision instrument that sits at the very heart of histology, pathology, and countless fields of scientific inquiry. From its early mechanical origins to the sophisticated, automated systems of today, its evolution has been a direct reflection of science’s drive to see deeper and with greater clarity. The ability to transform a three-dimensional biological sample into a two-dimensional slice, just a few millionths of a meter thick, is the gateway to understanding the intricate architecture of life and the subtle changes wrought by disease.
Mastering the art and science of microtomy involves a holistic understanding of the entire workflow—from tissue fixation to the final section on a slide. The quality of each preceding step directly impacts the potential for success at the microtome. Ultimately, choosing the right instrument for your laboratory is an investment not only in equipment but in the quality, efficiency, and validity of your results. It is an investment in the very foundation of microscopic discovery.
Explore HINOTEK’s curated selection of manual, semi-automatic, and fully automatic rotary microtomes, or contact our technical specialists to find the perfect solution for your laboratory’s unique needs.
9. References
Works cited
- lifecanvastech.com, https://lifecanvastech.com/microtome-types-and-applications/
- Microtome – Wikipedia, https://en.wikipedia.org/wiki/Microtome
- What are the parts of the Microtome? – Kalstein, accessed August 13, 2025, https://kalstein.net/en/2022/11/18/what-are-the-parts-of-the-microtome/
- Keeping Safe When Using a Microtome – Mercedes Scientific Histology Equipment 1, https://histologyequipment.com/microtome-saftey/
- Postbac Life: Lindsey Jay Demonstrates the Microtome – YouTube, accessed August 13, 2025, https://www.youtube.com/watch?v=BzchzVMJB3Y&pp=0gcJCfwAo7VqN5tD
- Rotary Microtome Section – YouTube, https://www.youtube.com/watch?v=KnMdSgd5mts
- Introduction to microtomy – YouTube, https://www.youtube.com/watch?v=MRIQZPCX45I&pp=0gcJCf8Ao7VqN5tD
This guide is maintained by HINOTEK’s core technical team, comprised of senior engineers and application scientists with over two decades of hands-on experience in fields such as microscopy, centrifugation, and spectrophotometry. We are committed to ensuring that every piece of information in this guide—from instrument principles and technical specifications to laboratory procurement advice—maintains the highest level of accuracy and timeliness.
This content is regularly reviewed and updated to reflect the latest industry standards and technological advancements. We value feedback from the global scientific community. Should you have any questions or suggestions, or wish to discuss any technical details, please do not hesitate to contact our expert team at [email protected].