
 |
When I first started in the lab, I thought the pH meter and its electrode were almost magical.
You insert a glass rod into a solution, and numbers instantly appear on the screen. Acid is acid, base is base—highly accurate. But if you asked me how it actually measured anything, I couldn’t tell you. Perhaps… measuring hydrogen ion concentration? As for what was inside that glass bulb, why it couldn’t be stored dry, or why it needed calibration before use—I was completely clueless.
That was until I accidentally left an electrode on the bench all day, forgetting to submerge it back into the potassium chloride (KCl) solution. The next day, the readings fluctuated wildly like a roller coaster. A senior lab technician took one look and said, “It’s ruined. Go requisition a new one.”
That was the first time I realized: this instrument is not to be used carelessly. If you don’t understand it, it will fail you.
1. What Exactly Is That Glass Bulb?
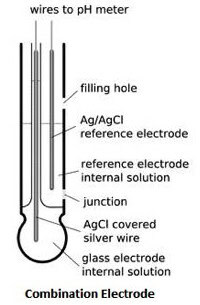 |
The most critical component of a pH electrode is the glass bulb at the very bottom.
It looks like a fragile miniature lightbulb, but it is actually a specialized glass membrane. This is not ordinary glass; it possesses a “selective response” to hydrogen ions. In simpler terms, it only interacts with hydrogen ions and ignores other ions in the solution.
Inside the bulb, there is a fixed concentration of potassium chloride (KCl) solution and a Silver/Silver Chloride (Ag/AgCl) reference wire. When the glass bulb is immersed in a sample, the difference in hydrogen ion concentration between the inside and outside of the bulb creates a potential difference across the glass membrane. The magnitude of this potential difference is directly proportional to the pH value of the solution.
This is the fundamental principle of pH measurement. You can think of the glass bulb as a “translator” that converts hydrogen ion concentration into an electrical signal, which the pH meter then translates into a readable pH value.
2. Why Can’t Electrodes Be Stored Dry? The “Hydration Layer” Is Key
Many lab personnel know that “pH electrodes cannot be stored dry,” but few know exactly why. The answer lies on the surface of the glass bulb.
This glass membrane does not function when dry. It requires “hydration” in water—water molecules penetrate the glass surface to form a thin hydration gel layer. This hydration layer is a prerequisite for the glass membrane to respond to hydrogen ions.
If the electrode dries out, the hydration layer disappears. If you then insert it into a solution, it takes a significantly long time to rehydrate, resulting in sluggish responses, drifting readings, or a complete lack of response.
This is why electrodes must be stored in a 3M KCl solution. The KCl solution keeps the bulb hydrated while maintaining an unobstructed liquid junction for the reference electrode. Never store electrodes in pure water (DI/RO water). Pure water will osmotically “pull” the KCl out from inside the bulb, severely reducing the electrode’s lifespan.
Pro Tip: If an electrode accidentally dries out, don’t throw it away immediately. Soak it in a 3M KCl solution for 24 to 48 hours; sometimes it can be revived. However, if left dry for weeks, it is likely damaged beyond repair.
3. The Reference Electrode: A Crucial “Reference Point”
Many users focus solely on the glass bulb and ignore the small hole or porous material on the electrode shaft—this is the liquid junction, the “exit” of the reference electrode.
pH measurement requires two electrodes: an indicator electrode (the glass bulb) and a reference electrode. The reference electrode’s job is to provide a stable, constant reference potential that does not fluctuate with the solution’s pH.
The reference electrode also contains KCl solution, which contacts the sample solution via the liquid junction. If this junction gets clogged, the reference potential becomes unstable, causing the pH meter readings to jump erratically.
If an electrode passes calibration but drifts wildly during sample measurement, it is highly likely that the liquid junction is clogged or the KCl solution in the reference electrode is depleted (in refillable models).
How to check for clogs: Inspect the liquid junction (usually a ceramic frit or fiber wick). If it appears white, crystalline, or visibly dirty, it is clogged. You can soak it in warm water (around 60°C) or gently apply pressure with a syringe at the fill hole to flush out the blockage. Do not apply excessive pressure, or you may damage the junction.
4. Why Calibrate Daily?
Some view pH meter calibration as a mere formality—if calibrated yesterday, is it really necessary today? The absolute answer is yes.
A pH electrode’s response is not permanent. Due to aging, temperature fluctuations, and varying sample properties, the electrode’s “zero point” (the potential at pH 7.00) and “slope” (the sensitivity of potential change per pH unit) will gradually drift over time.
Calibration tells the instrument: “This is the current state of the electrode; calculate the values based on this updated standard.” If you skip calibration, the meter uses outdated parameters, resulting in skewed data.
- Daily Use: Calibrate once before starting work each day.
- High-Volume Testing: Verify with a standard buffer solution every 1-2 hours. Recalibrate if drift is detected.
- Sample Switching: Recalibrate when switching between drastically different sample types (e.g., from strong acids to strong bases).
5. The Role of Temperature Compensation
pH electrode response is highly temperature-sensitive. The same solution might read pH 7.00 at 25°C, but pH 7.05 at 10°C. The solution hasn’t necessarily changed; the electrode’s response slope has.
Temperature compensation adjusts the instrument’s algorithm to account for the current temperature’s effect on the electrode’s slope. However, note that temperature compensation only corrects the electrode’s slope—it does not compensate for the actual chemical pH changes that occur in the solution itself due to temperature (e.g., carbonic acid solutions).
Common Mistake: Leaving a separate Automatic Temperature Compensation (ATC) probe on the benchtop while the pH electrode is in the sample. The ATC probe must be submerged alongside the pH electrode to measure the true temperature of the solution.
6. Are You “Murdering” Your Electrode? Common Bad Practices
Below is a breakdown of the most common lab practices that severely damage pH electrodes:
| Harmful Action | The Consequence | Correct Procedure |
|---|---|---|
| Dry Storage | Hydration layer dries out in hours, causing erratic or dead responses. | Always store the electrode submerged in a 3M KCl solution immediately after use. |
| Storing in Pure Water | Deionized/Distilled water leaches the internal KCl via osmosis, destroying the reference electrode. | Store strictly in 3M KCl solution. |
| Wiping/Scratching the Bulb | Rubbing with filter paper or stiff brushes generates static charge and can scratch the fragile membrane. | Gently blot (never wipe) with soft laboratory tissue, or rinse with dedicated cleaning solutions. |
| Forgetting the Fill Hole | Creates a vacuum preventing KCl flow (if closed during use), or allows evaporation/contamination (if left open in storage). | Open the fill hole during measurement. Close it tightly during storage. |
| Inverted Storage | The internal KCl solution pulls away from the glass membrane, drying it out from the inside. | Store vertically or at a slight angle with the bulb pointing down. |
7. Choosing the Right Electrode Matrix
Not all pH electrodes are created equal. Different sample matrices require specific electrode architectures. Using the wrong type doesn’t just result in inaccurate data—it often results in no data at all.
- Routine Aqueous Solutions: Standard glass body/epoxy electrodes.
- Strong Acids/Bases: Require specialized alkali-resistant or acid-resistant glass membranes.
- Protein-Heavy Samples: Require specialized liquid junctions (like double-junction or flushable junctions) to prevent protein precipitation and clogging.
- Micro-Volume Samples: Require micro or semi-micro electrodes.
- Semi-Solid or Solid Surfaces: Require robust spear-tip (penetration) electrodes or flat-surface electrodes.
A Final Note from HINOTEK Experts
After working with laboratory instruments for over a decade, we at HINOTEK know that scientific equipment has “personality.”
If you respect it—soak it on time, calibrate it regularly, and handle it with care—it will reliably deliver the accurate data you need. If you neglect it, it will give you drifting, erratic readings that compromise your entire experiment.
That small glass bulb may look insignificant, but it is the “heart” of your pH measurement. Understand its mechanisms, maintain it properly, and your analytical data will always stand up to scientific scrutiny.
To understand the electrochemical principles behind these measurements and to learn the correct procedures for calibration, explore our comprehensive guide: How a pH Meter Works & A Guide to pH Meter Calibration.