|
|
Section 1: Introduction: The Principle of Microscopic Cleaning
In the modern laboratory, the integrity of experimental data and the safety of personnel depend on an uncompromising standard of cleanliness. Achieving this standard presents a significant challenge. Traditional cleaning methods, such as manual scrubbing or automated spray washers, often prove inadequate. These techniques rely on direct physical contact or line-of-sight pressure, leaving them ineffective at decontaminating the complex geometries of modern laboratory equipment. Intricate items like cannulas, pipettes, surgical instruments, and glassware feature crevices, blind holes, and joints that are inaccessible to brushes and sprays. This is where microscopic contaminants—chemical residues, biological matter, or fine particulates—can persist, leading to cross-contamination and compromised results.
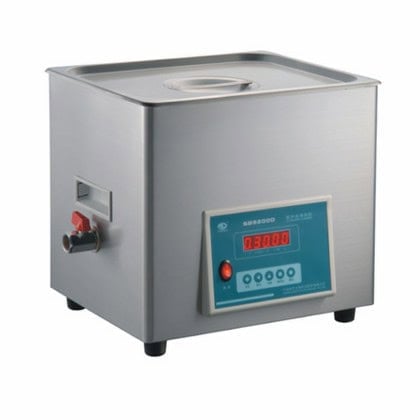
Ultrasonic Cleaner (View HINOTEK complete Ultrasonic Cleaner Catalog) offers a definitive solution to this challenge. It is a sophisticated process that utilizes high-frequency sound waves, known as ultrasound, to agitate a liquid cleaning medium. This agitation generates a uniquely powerful and pervasive cleaning effect. The process is fundamentally non-abrasive, meticulously removing contaminants without scratching, pitting, or otherwise damaging the surfaces of delicate instruments. This preserves the integrity and prolongs the lifespan of valuable laboratory assets, from sensitive optical components to precision-machined metal parts. The technology represents a fundamental shift in cleaning methodology. It moves beyond the limitations of macroscopic, surface-level cleaning to deliver a volumetric, microscopic decontamination. The cleaning action occurs wherever the liquid solution can penetrate, ensuring that even the most concealed surfaces are rendered scrupulously clean.
The core mechanism that drives this technology is a powerful physical phenomenon known as acoustic cavitation. This process involves the continuous formation and violent collapse of millions of microscopic bubbles within the cleaning fluid. Each collapse releases a tiny yet immense burst of energy, creating an intense scrubbing action at a microscopic scale. This is not a chemical process, but a physical one, using the energy of sound to dislodge contaminants with unparalleled precision and thoroughness. Understanding how this process works is essential for any laboratory professional or procurement specialist seeking to implement the highest standards of cleanliness and efficiency.
Section 2: The Science of Ultrasonic Cleaning: A Deep Dive into Acoustic Cavitation
 |
The remarkable efficacy of an ultrasonic cleaner is rooted in the physics of high-frequency sound waves and their interaction with a liquid medium. The process is elegant in its principle yet powerful in its execution, driven entirely by the phenomenon of acoustic cavitation. To fully appreciate its capabilities, it is necessary to understand the scientific steps that transform electrical energy into a microscopic cleaning force.
The Generation of High-Frequency Sound Waves
At its most basic level, sound is a pressure wave that propagates through a medium. An ultrasonic cleaner generates these pressure waves at frequencies far above the range of human hearing, typically beginning at 20 kilohertz (kHz). These waves travel through the cleaning solution as a series of alternating high-pressure and low-pressure cycles. This rapid oscillation, occurring tens of thousands of times per second, is the catalyst for the entire cavitation process.
The Physics of Cavitation
The cleaning power of the technology originates from the interaction between these pressure waves and the liquid. The process can be broken down into two distinct phases that correspond to the troughs and peaks of the sound wave.
Rarefaction (Low-Pressure Phase)
During the low-pressure phase, or rarefaction, the troughs of the sound wave pass through the liquid. This creates a state of negative pressure that effectively “stretches” or “tears” the liquid apart. In these areas of low pressure, the liquid’s cohesive forces are overcome, leading to the formation of millions of microscopic voids or partial vacuum bubbles. These bubbles, known as cavitation bubbles, are the nascent agents of the cleaning process.
Compression (High-Pressure Phase)
Following immediately after the low-pressure phase is the high-pressure phase, or compression, which corresponds to the peak of the sound wave. As this wave of positive pressure passes, it exerts immense force on the newly formed cavitation bubbles. The bubbles are compressed until they reach an unstable size and can no longer sustain their structure. At this point, they collapse violently in a process known as implosion. This entire cycle of bubble formation and collapse occurs in microseconds.
The Microscopic Scrubbing Effect
The implosion of a cavitation bubble is not a gentle event. It is a highly energetic process that unleashes significant force in a microscopic area. This is what produces the physical “scrubbing” effect that defines ultrasonic cleaning.
Energy Release
The collapse of each bubble is so violent that it generates extreme localized conditions. Temperatures within the imploding bubble can reach an estimated 5,000 K, and pressures can exceed 135 megapascals (MPa), or approximately 500 atmospheres. However, because these events are microscopic and fleeting, the immense heat dissipates almost instantly, and the overall temperature of the cleaning solution is not significantly affected. The energy released is focused solely on dislodging contaminants from the surface of any immersed object.
Microjets and Shockwaves
When a cavitation bubble implodes near a solid surface, its collapse is asymmetrical. This asymmetry creates a high-velocity microjet of cleaning solution, which can travel at speeds up to 400 km/hr. This jet, about one-tenth the size of the original bubble, slams into the surface of the object being cleaned. The combination of pressure, temperature, and velocity from this microjet and the accompanying shockwaves provides the physical force needed to break the bonds between contaminants and the substrate, effectively lifting them away.
Factors Influencing Cavitation Efficiency
The primary action of ultrasonic cleaning is physical, driven by the mechanical energy of cavitation. The chemical cleaning solution serves as a critical enhancer of this physical process. It works by weakening the chemical bonds of contaminants and, just as importantly, by optimizing the liquid’s properties for efficient bubble formation and collapse. This distinction is key to troubleshooting; poor results can stem from a failure in the physical action (e.g., machine settings) or the chemical action (e.g., wrong solution).
One of the most significant factors affecting cavitation is the presence of dissolved gases in the cleaning solution. Freshly prepared solutions contain dissolved air, which can enter the cavitation bubbles as they form. These gas-filled bubbles act like tiny cushions or shock absorbers. When the compression wave hits, they compress rather than violently implode, dampening the energy release and severely reducing cleaning efficiency. For this reason, degassing the solution before starting a cleaning cycle is a critical and non-negotiable step for achieving optimal performance. Other liquid properties, such as viscosity, surface tension, and temperature, also play a vital role and must be carefully controlled to maximize the power of cavitation.
Section 3: Anatomy of a Laboratory Ultrasonic Cleaner
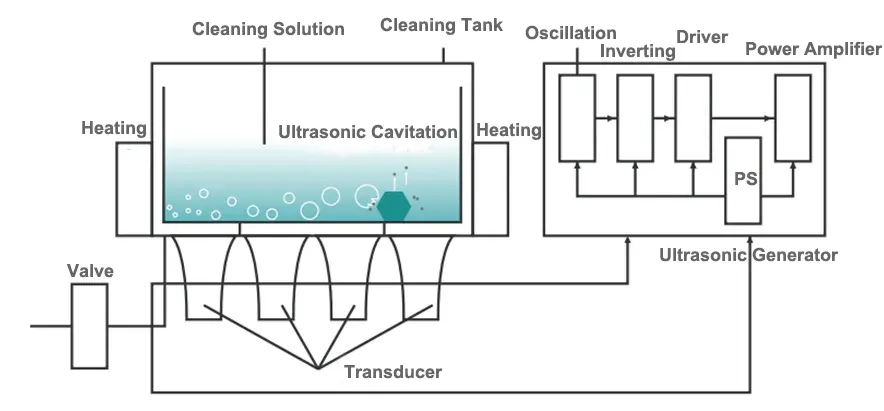
An ultrasonic cleaner is not merely a bath; it is an engineered system where each component plays a precise role in a chain of energy conversion. This chain begins with standard electrical power and ends with the intense physical scrubbing action of cavitation. Understanding the function of each core component is essential for operators to achieve consistent results and for procurement specialists to make informed purchasing decisions. The performance of the entire system depends on the quality and synergy of its parts. A powerful generator paired with poorly bonded transducers, for instance, will result in inefficient energy transfer and subpar cleaning.
The System’s Core Components
A laboratory ultrasonic cleaner is composed of three essential parts that work in concert:
- The Ultrasonic Generator: The electronic power source.
- The Transducer(s): The electromechanical converters.
- The Cleaning Tank: The acoustic and chemical environment.
The Ultrasonic Generator: The Electronic Heart of the System
|
|
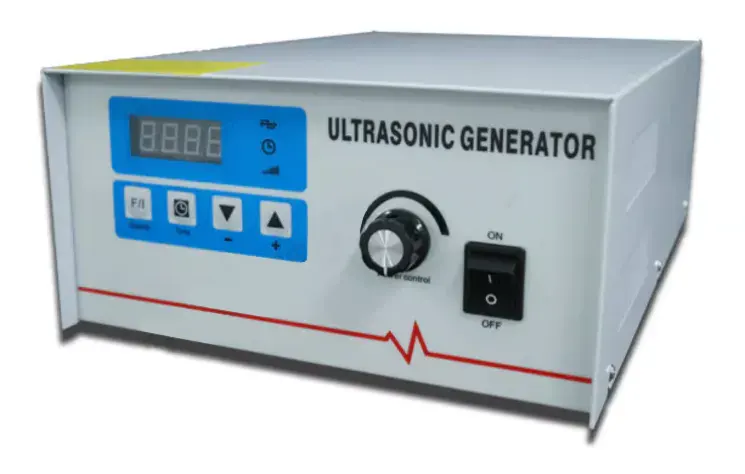
The ultrasonic generator is the brain and engine of the system. Its primary function is to take standard alternating current (AC) from a wall outlet, typically at 50 or 60 Hz, and convert it into a high-frequency, high-voltage electrical signal. This specialized signal is precisely what is needed to drive the transducers at their resonant ultrasonic frequency.
Modern generators are far more sophisticated than simple frequency converters. They often include advanced features that significantly enhance cleaning consistency and effectiveness.
- Sweep Frequency: This is a critical feature in high-performance cleaners. Instead of operating at a single, fixed frequency, the generator purposefully varies or “sweeps” the frequency across a narrow band (e.g., 40±2 kHz). This prevents the formation of “standing waves” in the tank, which create areas of intense activity (“hot spots”) and areas of no activity (“dead zones”). A sweeping frequency ensures that cavitation energy is distributed uniformly throughout the entire tank, providing a consistent clean on all surfaces of the immersed objects.
- Pulse Mode: Some generators offer a pulse mode, which provides intermittent bursts of increased ultrasonic power. This feature is particularly effective for removing stubborn or caked-on contaminants that may resist standard cavitation energy.
The Transducer: Converting Energy into Vibration
|
|
The transducer is the component that performs the crucial energy conversion from the electrical to the mechanical domain. It receives the high-frequency electrical signal from the generator and transforms it into physical vibrations at the same ultrasonic frequency. These vibrations are then transmitted into the cleaning tank and solution, creating the pressure waves that initiate cavitation. There are two primary types of transducers used in ultrasonic cleaners.
Piezoelectric Transducers
This is the most common type found in laboratory and commercial ultrasonic cleaners. These transducers are constructed from piezoelectric crystals, typically a ceramic material like lead zirconate titanate (PZT). Piezoelectric materials exhibit a unique property: they physically change shape—expanding and contracting—when an electrical voltage is applied. The generator sends a rapidly oscillating voltage to the transducer, causing the crystal to vibrate at a high frequency. These transducers are typically bonded to the bottom or sides of the cleaning tank.
Magnetostrictive Transducers
Used more often in heavy-duty industrial applications, magnetostrictive transducers are known for their exceptional ruggedness and longevity. They consist of a stack of nickel laminations wrapped in a coil of wire. When an alternating current from the generator flows through the coil, it creates a fluctuating magnetic field. This field causes the nickel stack to expand and contract, producing powerful mechanical vibrations. While piezoelectric transducers are more common, magnetostrictive types offer superior durability, often being silver-brazed directly to the tank for a permanent, highly efficient bond.
The Cleaning Tank: The Operational Environment
The cleaning tank is more than just a container for the solution and the items to be cleaned. It is an integral part of the acoustic system.
- Material and Construction: Laboratory cleaner tanks are almost universally constructed from stainless steel. This material is chosen for its excellent durability, corrosion resistance against a wide range of cleaning chemistries, and its ability to effectively transmit acoustic energy.
- Function as a Diaphragm: The surface of the tank to which the transducers are bonded—usually the bottom or sides—acts as a radiating diaphragm. As the transducers vibrate, they cause this surface to vibrate in unison, efficiently propagating the pressure waves throughout the liquid in the tank.
- Essential Features: A well-designed laboratory ultrasonic cleaner tank will include several key features for convenience and safety, such as a fill line to indicate the optimal solution level, a drain valve for easy emptying, and a lid. The lid is important for reducing noise, minimizing solution evaporation, and helping to maintain a stable solution temperature.
Section 4: Optimizing Performance: Mastering Key Cleaning Parameters
Achieving consistent, high-quality results with an ultrasonic cleaner requires more than simply turning the machine on. It involves a systematic approach to controlling the four key parameters that govern the cleaning process: frequency, temperature, chemistry, and time/power. These variables are interconnected; optimizing one in isolation is rarely effective. The best outcomes are achieved when these four pillars are balanced to create a protocol tailored to the specific cleaning challenge. This systematic approach allows a lab professional to move beyond trial and error and develop repeatable, validated cleaning procedures. For example, when cleaning stainless steel instruments with biological soil, one would select an appropriate frequency (e.g., 40 kHz), a suitable alkaline enzymatic cleaner, a temperature that is effective for the chemistry but low enough to prevent protein coagulation (e.g., below 40°C), and then determine the optimal cleaning time through testing.
Ultrasonic Frequency: The Balance Between Power and Precision
The operating frequency of an ultrasonic cleaner is perhaps the most fundamental parameter, as it directly determines the nature of the cavitation bubbles and, consequently, the style of cleaning. There is an inverse relationship between frequency and the energy of the cavitation event.
- Lower Frequencies (20-40 kHz): These frequencies produce relatively large cavitation bubbles. Because the bubbles have more time to grow during each cycle, their collapse is more violent, releasing a greater amount of energy. This creates a powerful, aggressive scrubbing action ideal for removing heavy, stubborn contaminants like caked-on grease, polishing compounds, and thick residues from robust materials such as stainless steel, glass, and cast metals.
- Mid-Range Frequencies (40-80 kHz): This is the most common and versatile range for general laboratory applications. It offers an excellent balance between cleaning power and precision. The cavitation bubbles are small enough to penetrate intricate features and gentle enough for most standard instruments, yet still powerful enough to remove a wide variety of common laboratory soils effectively. This range is suitable for cleaning general glassware, surgical instruments, and printed circuit boards (PCBs).
- Higher Frequencies (80 kHz and above): As the frequency increases, the cavitation bubbles become progressively smaller and more numerous. Their implosion is gentler, releasing less energy per event. This makes high frequencies ideal for precision cleaning of delicate and sensitive components where the risk of surface damage, such as pitting or erosion, must be avoided. The smaller bubbles are also exceptionally effective at penetrating microscopic crevices, blind holes, and complex geometries. This range is used for items like optical lenses, medical micro-instruments, and sensitive electronic components.
To aid in selection, the following table provides a guide for matching the ultrasonic frequency to common laboratory applications.
Table 1: Ultrasonic Frequency Application Guide
| Frequency Range (kHz) | Cavitation Bubble Size | Cleaning Intensity | Typical Laboratory Applications | Material Compatibility Notes |
| 20–40 | Large | Aggressive / High Power | Heavy-duty cleaning of robust parts (e.g., large glass beakers, stainless steel machine parts). Removing thick oils, grease, polishing compounds. | Best for durable materials like stainless steel, glass, and cast iron. May cause surface pitting on softer metals like aluminum. |
| 40–80 | Medium | Moderate / General Purpose | General laboratory cleaning of glassware, pipettes, surgical and dental instruments, PCBs. Removing biological residues, chemical precipitates, light oils. | The most versatile range. Safe for most metals, plastics, glass, and ceramics. Standard for most benchtop lab cleaners. |
| 80–130 | Small | Gentle / Precision | Fine cleaning of delicate items (e.g., optical lenses, micro-instruments, sensitive electronics, silicon wafers). Removing fine particulates and fingerprints. | Ideal for sensitive materials and items with intricate, microscopic features. Reduces risk of surface damage or erosion. |
| >130 (Megasonic) | Microscopic | Ultra-Delicate | Ultra-fine cleaning of highly sensitive components like microelectronics, MEMS devices, and medical implants at a sub-micron level. | Used in specialized applications where even the slightest surface alteration is unacceptable. |
Temperature: The Role of Heat in Enhancing Efficacy
Temperature is a critical catalyst in the ultrasonic cleaning process. Heating the cleaning solution, typically to a range of 40-60°C (104-140°F), provides several key benefits. First, it lowers the viscosity and surface tension of the liquid, which allows for the formation of more effective cavitation bubbles. Second, elevated temperatures significantly accelerate the chemical activity of the cleaning solution, helping it to more quickly break down and dissolve soils like oils, waxes, and greases.
However, there is a point of diminishing returns. As the temperature approaches the solution’s boiling point, the cavitation bubbles tend to fill with vapor. This vapor cushions the implosion, reducing the intensity of the scrubbing action. Furthermore, heat can be detrimental for specific applications. A crucial example in laboratory and medical settings is the cleaning of instruments contaminated with blood or other biological soils. Temperatures above 40°C (104°F) can cause proteins to coagulate, making them adhere more strongly to the instrument surface and significantly harder to remove.
Cleaning Solution Chemistry: The Catalyst for Superior Results
While ultrasonic cleaning can function with plain water, its true potential is unlocked with the use of a chemically-formulated aqueous solution. These solutions are designed to perform two primary functions: first, to reduce the surface tension of the water, which promotes more vigorous cavitation; and second, to chemically interact with and break down the specific contaminants being targeted. The selection of the correct chemistry is paramount and is largely guided by the solution’s pH level.
- Alkaline Solutions (pH > 7): These are highly effective for removing organic contaminants. Their chemistry is designed to emulsify and saponify fats, oils, greases, and proteins, making them ideal for cleaning parts soiled with machining oils or biological residues.
- Acidic Solutions (pH < 7): These are formulated to remove inorganic contaminants. They excel at dissolving rust, scale, mineral deposits, and oxides from metal surfaces. Caution must be exercised when using acidic solutions, as they can be corrosive to the stainless steel tank if not used with a protective liner.
- Neutral Solutions (pH ≈ 7): These offer a gentler cleaning action and are used when material compatibility is the primary concern. They are suitable for removing light soils like dust and fingerprints from delicate or sensitive materials that could be damaged by aggressive acidic or alkaline chemistries.
The following table serves as a guide for selecting the appropriate cleaning solution based on the contaminant and the material of the object being cleaned.
Table 2: Cleaning Solution pH Guide
| pH Range | Solution Type | Targets These Contaminants | Ideal for These Materials | Materials to Avoid |
| 0–6 | Acidic | Rust, scale, mineral deposits, oxides, tarnish. | Ferrous metals (with rust inhibitors), brass, copper. | Aluminum, magnesium, and other reactive metals. Use with caution in stainless steel tanks (requires protective liner). |
| 6–8 | Neutral | Light oils, dust, fingerprints, general particulate matter. | Highly sensitive materials: delicate plastics, aluminum, polished surfaces, jewelry, optics. | Not effective for heavy or stubborn organic or inorganic soils. |
| 8–14 | Alkaline | Heavy oils, grease, waxes, proteins, biological soils (blood, tissue), polishing compounds, soot. | Stainless steel, steel, cast iron, titanium, glass, ceramics, robust plastics. | Soft, reactive metals like aluminum and zinc (unless a specially formulated, inhibited alkaline cleaner is used). |
Power and Time: Controlling Intensity and Duration
- Power: Ultrasonic power is typically measured in watts per gallon (or liter) of solution. Increasing the power increases the number of cavitation bubbles generated, which can lead to faster and more intense cleaning. However, beyond an optimal point, adding more power yields diminishing returns and can increase the risk of surface erosion or damage to delicate parts. Many modern units offer adjustable power, allowing the operator to fine-tune the intensity for the task at hand.
- Time: The duration of the cleaning cycle is a critical variable that depends on the severity of the contamination, the cleaning chemistry, the temperature, and the material of the part. Typical cleaning times range from 3 to 15 minutes. The optimal time is often determined through experience and observation, starting with shorter cycles and extending them as necessary to achieve the desired level of cleanliness.
Section 5: A Practical Guide: Operating Your Laboratory Ultrasonic Cleaner
Following a standardized operating procedure is essential for achieving effective, repeatable cleaning results while ensuring operator safety and prolonging the life of the equipment. This step-by-step guide translates the scientific principles and operational parameters into a practical workflow for daily laboratory use.
Step 1: Workspace Preparation and Safety Protocols
Before beginning any cleaning cycle, prepare the workspace. Place the ultrasonic cleaner on a stable, level, and chemical-resistant surface. Ensure the area is well-ventilated, especially when using solutions that may produce vapors. The unit must be connected to a properly grounded electrical outlet that can handle its power requirements. Finally, don the appropriate Personal Protective Equipment (PPE). At a minimum, this includes chemical-resistant gloves to protect your hands from the cleaning solution and safety goggles or a face shield to protect your eyes from splashes.
Step 2: Solution Preparation and Degassing
Proper solution preparation is a critical first step. Fill the cleaner’s tank to the indicated fill line with a suitable solvent, which for most laboratory applications is high-purity or deionized water. Using deionized water prevents the mineral deposits that can accumulate from tap water. Never operate the unit with an empty or underfilled tank, as this can cause the transducers to overheat and fail permanently. Add the correct concentration of the selected cleaning solution concentrate, following the manufacturer’s dilution instructions precisely.
Once the solution is prepared, it must be degassed. Fresh solutions contain dissolved gases that severely inhibit the cavitation process. To degas, run the cleaner’s dedicated “degas” cycle if it has one. If not, simply run the ultrasonics for 5 to 10 minutes before loading any items. You will see large bubbles rising to the surface; the process is complete when this activity subsides and the unit settles into a steady, hissing sound.
Step 3: Proper Loading of Instruments and Glassware
How items are loaded into the cleaner has a direct impact on cleaning effectiveness. The most important rule is to always use a mesh basket or a suspension rack. Never place items directly on the bottom of the tank. Direct contact can dampen the transducer vibrations, create “dead zones” on the item, and cause cavitation erosion that can eventually wear through the stainless steel tank.
Do not overload the basket. Items should be arranged so that they are not touching one another. This allows the cleaning solution and ultrasonic waves to access all surfaces uniformly. For instruments with hinges, such as forceps or scissors, place them in the cleaner in an open position. If possible, disassemble complex items to ensure all components are thoroughly cleaned.
Step 4: Setting Optimal Parameters
With the solution degassed and items properly loaded, set the cleaning parameters on the unit’s control panel.
- Temperature: Set the heater to the optimal temperature for your cleaning solution and the type of contaminant. Remember to use a lower temperature (below 40°C) for biological soils to prevent coagulation.
- Time: Set the cleaning timer. For new applications, it is best to start with a shorter cycle, such as 5 to 10 minutes. You can then inspect the items and add more time if needed.
- Special Modes: If your cleaner has advanced features, engage them as needed. Use “Sweep” mode for most applications to ensure uniform cleaning. Use “Pulse” mode for items with particularly stubborn contamination.
Step 5: Executing the Cleaning Cycle
Place the lid on the ultrasonic cleaner. This helps to maintain the solution temperature, reduces energy consumption, and significantly lowers the audible noise produced during operation. Start the cleaning cycle. A consistent hissing or buzzing sound is an indicator of healthy cavitation activity throughout the tank. Monitor the cycle as needed.
Step 6: Post-Cleaning Rinsing and Drying
Once the cycle is complete, turn off the ultrasonics and the heater. Carefully lift the basket out of the tank, holding it above the tank for a moment to allow excess solution to drain back. The items and the solution will be hot, so handle with care.
Thorough rinsing is a critical final step. Rinse the items completely with clean, deionized water to remove any residual cleaning solution and dislodged contaminants. Failure to rinse properly can leave behind a chemical film. After rinsing, dry the items thoroughly. This can be done by air drying on a clean rack, using filtered compressed air, or placing them in a drying oven. Proper drying prevents water spots and minimizes the risk of corrosion on metal instruments.
Section 6: Applications in the Modern Scientific Environment
The versatility and effectiveness of ultrasonic cleaning have made it an indispensable technology across a vast spectrum of scientific and technical fields. Its ability to deliver microscopic cleanliness ensures the reliability of experimental results, prevents cross-contamination, and maintains the integrity of sensitive equipment.
General Laboratory Decontamination
In any general research or analytical laboratory, ultrasonic cleaners are the workhorse for routine decontamination. They are used for cleaning a wide array of standard equipment, including glass beakers, flasks, graduated cylinders, test tubes, and metal spatulas. The process efficiently removes stubborn chemical residues, baked-on biological films, and fine particulate matter that manual washing often misses, ensuring that glassware is analytically clean for the next experiment.
Pharmaceutical and Biotech Applications
In the highly regulated pharmaceutical and biotechnology industries, cleanliness is directly linked to product safety and efficacy. Ultrasonic cleaners play multiple critical roles in these environments.
- Equipment Cleaning: To prevent cross-contamination between different product batches, manufacturing equipment such as tablet press punches and dies, molds, mixing vessels, valves, and filtration components are rigorously cleaned. Ultrasonics can penetrate the complex internal geometries of this equipment to remove all traces of active pharmaceutical ingredients (APIs) and excipients.
- Sample Preparation: Beyond cleaning, ultrasonic baths are frequently used as sonicators for sample preparation. The ultrasonic energy is used to efficiently dissolve difficult solutes, disperse and deagglomerate nanoparticles, homogenize emulsions, and lyse cells for extraction of intracellular components.
- HPLC Solvent Degassing: In analytical chemistry, ultrasonic baths are essential for preparing mobile phases for High-Performance Liquid Chromatography (HPLC). The ultrasonic energy effectively removes dissolved gases from the solvents, which, if left in, can form bubbles in the HPLC system and interfere with detector readings, leading to inaccurate results.
Pre-Sterilization Cleaning of Medical and Dental Instruments
Ultrasonic cleaning is a cornerstone of modern sterile processing in hospitals, clinics, and dental offices. It serves as a critical pre-cleaning step before final sterilization. Manually scrubbing complex surgical instruments, especially those with lumens, hinges, and serrated edges, is time-consuming and risks exposing technicians to pathogens via sharps injuries. Ultrasonic cleaners automate this process, using cavitation to safely and effectively remove all traces of blood, tissue, and other biological soils from instruments. This includes complex devices like endoscopes, dental drills, and robotic surgical tools, ensuring they are free of bioburden that could shield microorganisms from the subsequent sterilization process.
Precision Cleaning of Electronics and Sensitive Components
In electronics manufacturing and research, even microscopic contamination can cause component failure. Ultrasonic cleaners are used to remove contaminants like solder flux, paste, and fingerprints from Printed Circuit Boards (PCBs) and other electronic assemblies. For highly sensitive components, such as optical lenses, scientific sensors, and micro-electromechanical systems (MEMS), high-frequency ultrasonic or megasonic cleaning is employed. The gentler action of the smaller cavitation bubbles provides meticulous cleaning without causing vibrational damage to these delicate structures. However, extreme care must be taken, as certain components like gyroscopes can be damaged even by high-frequency vibrations, requiring carefully validated cleaning protocols.
Section 7: Selecting the Right Ultrasonic Cleaner for Your Laboratory
Choosing the appropriate ultrasonic cleaner is a critical investment for any laboratory. The decision should be based on a thorough assessment of the lab’s specific cleaning requirements, throughput needs, and the types of materials being processed. A well-chosen unit will serve as a reliable asset for years, while an ill-suited one can lead to inefficient cleaning, damaged equipment, and operational bottlenecks.
Defining Your Needs: Tank Size and Capacity
The first consideration is the physical size of the unit. You must assess the dimensions of the largest items or batches of items that you will need to clean regularly. The internal tank dimensions must be sufficient to fully submerge these items. It is crucial to also consider the dimensions of the cleaning basket, which will always be smaller than the internal tank dimensions. Plan for a tank size that comfortably accommodates your largest workload without being excessively large, which would waste energy and cleaning solution.
Evaluating Frequency Needs: The Power of Choice
The required ultrasonic frequency is dictated by your cleaning applications.
- Fixed Frequency Units: A single-frequency cleaner (most commonly around 40 kHz) is a cost-effective choice for laboratories that have a consistent and well-defined cleaning task, such as general glassware decontamination.
- Dual-Frequency Units: For laboratories with diverse cleaning needs, a dual-frequency unit offers significant versatility. These models allow the operator to switch between a lower frequency (e.g., 25 or 37 kHz) for aggressive cleaning of robust parts and a higher frequency (e.g., 80 kHz) for gentle, precision cleaning of delicate components.
- Sweep Technology: For any high-stakes application where cleaning uniformity and safety of delicate parts are paramount, a generator with sweep frequency is an essential feature. By modulating the frequency around a central point, sweep technology eliminates dead zones and prevents the intense, localized energy of standing waves, ensuring a consistent and safe cleaning action throughout the entire tank.
Essential Features and Controls
Modern laboratory ultrasonic cleaners come with a range of features designed to improve performance, repeatability, and ease of use.
- Heaters and Temperature Control: A built-in heater with precise digital temperature control is a non-negotiable feature for nearly all laboratory applications. The ability to heat the solution to the optimal temperature is critical for maximizing the effectiveness of the cleaning chemistry.
- Digital Timers: A digital timer allows for precise and repeatable control over the cleaning cycle duration. Look for models with an auto-shutoff feature, which enhances safety and allows the cleaning process to run unattended.
- Advanced Modes: High-performance units often include special operating modes. A Degas mode simplifies and accelerates the essential process of removing trapped air from fresh solutions. A Pulse mode provides a temporary power boost to tackle stubborn soils, while Sweep mode ensures uniform cleaning.
Assessing Build Quality and Durability
A laboratory is a demanding environment, and the ultrasonic cleaner must be built to withstand continuous use.
- Tank Material: The cleaning tank should be constructed from high-quality, corrosion-resistant stainless steel to ensure longevity and compatibility with a wide range of cleaning solutions.
- Overall Construction: Evaluate the quality of the entire system, including the housing, the electronic components of the generator, and the bonding of the transducers. Robust construction is a key indicator of long-term reliability.
- Supplier Support: Finally, consider the manufacturer and supplier. A reputable provider will offer a comprehensive warranty, responsive technical support, and readily available spare parts and accessories. This support is invaluable for minimizing downtime and maximizing the return on your investment.
Section 8: Equipment Longevity: Maintenance and Troubleshooting
Proper maintenance and safe operation are crucial for protecting your investment in an ultrasonic cleaner and ensuring it delivers optimal performance over its entire lifespan. Adhering to a routine maintenance schedule and following key safety protocols will prevent common issues, minimize downtime, and safeguard laboratory personnel.
Essential Safety Practices
Operating an ultrasonic cleaner involves potential electrical, chemical, and physical hazards that must be managed through strict adherence to safety protocols.
- Electrical Safety: The unit must always be connected to a properly grounded outlet. To prevent electrical shock, always unplug the cleaner before filling or draining the tank. Never immerse the main unit in water or spray down the housing or control panel.
- Chemical Safety: The most critical chemical safety rule is to never use flammable solvents like alcohol, gasoline, or acetone in a standard ultrasonic cleaner. The energy of cavitation can heat these liquids to their flash point, creating a serious risk of fire or explosion. Use only water-based, non-flammable cleaning solutions. When handling cleaning concentrates, always wear appropriate PPE and ensure the work area is well-ventilated.
- Personal Safety: Never place hands or other body parts into the cleaning bath while the unit is operating. The combination of chemical solutions, heat, and the focused energy of cavitation can cause skin irritation or burns. Always use the lid during operation to contain aerosols, reduce noise levels, and conserve heat.
A Routine Maintenance Checklist
A simple, consistent maintenance routine can prevent the vast majority of common problems.
- Daily: The cleaning solution should be changed whenever it becomes visibly dirty or at the end of each day. A contaminated solution loses its effectiveness and can redeposit soils onto cleaned items. After draining, rinse the tank with clean water and wipe it dry with a soft, non-abrasive cloth.
- Weekly: Perform a visual inspection of the unit. Check the power cord for any signs of wear or damage. Wipe down the exterior housing and control panel to keep them clean.
- Monthly: It is good practice to periodically verify the cleaner’s performance. This can be done with the “aluminum foil test.” Suspend a piece of lightweight aluminum foil in the bath and run the ultrasonics for a few minutes. A properly functioning unit will produce uniform pitting or perforation across the foil’s surface. Also, inspect the inside of the tank for any sediment or mineral buildup (furring), which should be cleaned out to prevent damage.
The following table provides a first-line diagnostic guide for common issues that may arise during operation.
Table 3: Common Troubleshooting Guide
| Symptom | Possible Cause | Recommended Solution/Action |
| Weak or No Cleaning Activity | 1. Solution not degassed. | Run a degas cycle or operate the unit for 5-10 minutes before loading parts. |
| 2. Incorrect cleaning solution or concentration. | Verify that the solution chemistry (pH) matches the contaminant and material. Check dilution ratio. | |
| 3. Solution is old, dirty, or saturated. | Drain the tank, clean it, and refill with fresh, properly prepared solution. | |
| 4. Tank is overloaded or items are on the bottom. | Reduce the number of items in the basket. Ensure nothing is in direct contact with the tank bottom. | |
| 5. Transducer or generator failure. | Perform a foil test. If activity is weak or absent, contact technical support for service. | |
| Insufficient Heating | 1. Heater is not activated or set correctly. | Check the control panel to ensure the heater is on and set to the desired temperature. |
| 2. Faulty heating element or thermostat. | If the unit does not heat despite being set correctly, contact technical support for service. | |
| Excessive Noise | 1. Items vibrating against the tank or each other. | Ensure items are properly placed in the basket and are not in contact with the tank walls or bottom. |
| 2. Low solution level. | Check that the tank is filled to the proper operating level line. | |
| 3. Worn transducer. | A change in the operational sound over time may indicate transducer wear. Contact technical support. | |
| Uneven Cleaning Results | 1. “Dead zones” due to standing waves. | If the unit lacks a sweep function, try repositioning the basket during the cycle. |
| 2. Items are shadowing each other. | Rearrange items in the basket to ensure they are not clustered together, allowing for better wave exposure. | |
| 3. Contaminated cleaning solution. | A dirty solution can redeposit contaminants unevenly. Replace the solution. |
Section 9: Conclusion: Integrating Precision Cleaning into Your Workflow
The ultrasonic cleaner is more than an advanced piece of laboratory equipment; it is a foundational tool for ensuring scientific integrity and operational excellence. By harnessing the physical power of acoustic cavitation, this technology delivers a level of cleanliness that is simply unattainable with conventional methods. It meticulously removes contaminants from every surface, including the most intricate and inaccessible regions of complex instruments, providing a degree of certainty that is essential for reliable and reproducible results.
The benefits of integrating ultrasonic cleaning into a laboratory workflow are comprehensive and compelling. It provides superior and consistent cleaning outcomes, which directly translates to higher quality data and a reduced risk of experimental failure due to contamination. It dramatically increases efficiency by automating a labor-intensive task, freeing skilled personnel to focus on higher-value activities and increasing instrument throughput. Furthermore, by minimizing the need for manual scrubbing of sharp or contaminated instruments and reducing reliance on harsh chemicals, it significantly enhances operator safety. Finally, its gentle, non-abrasive action protects and prolongs the life of delicate, expensive laboratory assets.
Adopting ultrasonic cleaning is not merely a procedural upgrade. It represents a commitment to a higher standard of practice—a standard where data is trustworthy, processes are efficient, and the laboratory environment is safer. By understanding the principles of its operation, mastering its key parameters, and adhering to best practices for use and maintenance, any modern scientific facility can leverage this powerful technology to achieve a new benchmark of excellence. HINOTEK provides a comprehensive range of high-performance, reliable ultrasonic cleaners designed to help your laboratory meet and exceed this standard.
If you are ready to find the right Ultrasonic Cleaner for your laboratory, please browse our complete product range: Ultrasonic Cleaner
This guide is maintained by HINOTEK’s core technical team, comprised of senior engineers and application scientists with over two decades of hands-on experience in fields such as microscopy, centrifugation, and spectrophotometry. We are committed to ensuring that every piece of information in this guide—from instrument principles and technical specifications to laboratory procurement advice—maintains the highest level of accuracy and timeliness.
This content is regularly reviewed and updated to reflect the latest industry standards and technological advancements. We value feedback from the global scientific community. Should you have any questions or suggestions, or wish to discuss any technical details, please do not hesitate to contact our expert team at [email protected].