|
|

The Microscope: Unveiling the Invisible World
Introduction: A Window to the Microscopic Realm
A microscope (View HINOTEK Microscope Category) is a scientific instrument that utilizes lenses or a system of lenses to produce a magnified image of an object that is too small to be seen clearly with the naked eye. The term “microscopic” refers to anything invisible to the eye unless aided by this powerful tool. The science of investigating these small objects and structures is known as microscopy. For centuries, the microscope has been a cornerstone of scientific inquiry, serving as our primary window into a world teeming with life and complexity that exists just beyond the limits of human vision.
From revealing the intricate architecture of a living cell to inspecting the crystalline structure of a metal alloy, the microscope is an indispensable tool across a vast spectrum of disciplines. It is fundamental to biology, medicine, materials science, forensics, and countless other fields. By allowing us to observe, measure, and understand the microscopic world, this instrument has driven some of the most profound discoveries in human history and continues to be a critical engine of innovation and progress in laboratories and industries worldwide.
A Brief History of the Microscope: Key Milestones and Pioneers
The journey to visualize the microscopic world is a compelling story of curiosity, ingenuity, and the profound feedback loop between technology and scientific discovery. Each advancement in optical technology unlocked new realms for observation, which in turn spurred new questions and demanded even more powerful instruments.
- The Invention (c. 1595): The genesis of the microscope is attributed to Zacharias Janssen and his father, Hans, spectacle makers in Holland who experimented with placing multiple lenses in a tube. Their creation, the first compound microscope, was a simple device capable of magnifications from 3x to 9x, yet it laid the conceptual foundation for all that would follow.
- The 17th Century Revolution: This era saw the microscope evolve from a novelty into a true scientific instrument in the hands of two pioneering figures.
|
|
- Robert Hooke (1635-1703): In England, Robert Hooke significantly improved the compound microscope. In his seminal 1665 book, Micrographia, he documented his observations of a vast array of objects. While examining a thin slice of cork, he observed a honeycomb-like structure of tiny compartments, which he famously named “cells”. This was the first time the fundamental building block of life had been described, and his detailed illustrations inspired a generation of scientists.
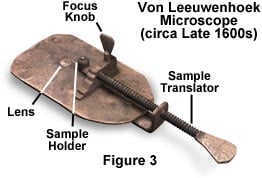
- Anton van Leeuwenhoek (1632-1723): A Dutch draper and scientist, van Leeuwenhoek was inspired by Hooke’s work but took a different approach. He mastered the art of grinding and polishing single, tiny lenses of remarkable curvature, creating simple microscopes with magnifications up to 300x—far surpassing the compound microscopes of his time. With these powerful lenses, he became the first human to observe and document living microorganisms. He described a world of “animalcules” in a drop of pond water, discovered bacteria, observed yeast, and detailed the microscopic structure of blood cells and spermatozoa. Van Leeuwenhoek’s discoveries opened up the entirely new field of microbiology.
- Industrialization and Standardization (18th-19th Centuries): The Industrial Revolution brought about significant advancements in manufacturing. The production of standardized, interchangeable parts made microscopes more reliable, affordable, and accessible. This democratization of microscopy led to its widespread adoption in research and medicine, fueling a new wave of discoveries.
- The Modern Era (20th Century): The 20th century marked the limit of what was possible with visible light. In the 1930s, the electron microscope was developed, using beams of electrons instead of light to achieve vastly superior magnification and resolution, allowing scientists to visualize viruses and even molecules for the first time. This leap in technology did not render the optical microscope obsolete; instead, it spurred the development of new and advanced light microscopy techniques—such as phase contrast, DIC, and fluorescence—that continue to be essential for observing living systems.
The Fundamental Principles of Optical Microscopy
To effectively use a microscope and select the right instrument, it is essential to understand the core optical principles that govern its function. The quality of a microscopic image is not determined by a single factor, but by the interplay of magnification, resolution, and contrast.
How a Light Microscope Works: The Journey of Light
The basic principle of a light microscope involves illuminating a specimen and using a series of lenses to magnify the light that passes through or reflects off it. In a typical compound microscope, the light follows a precise path:
 |
- Illumination: Light originates from a source, such as a halogen lamp or an LED, housed in the microscope’s base or illuminator.
- Condensing: The light passes through a series of components in the substage, including a field diaphragm (which controls the size of the illuminated area) and the condenser. The condenser is a critical lens system that gathers the light and focuses it into a cone that illuminates the specimen with uniform intensity. Within the condenser is an aperture diaphragm, which controls the angle of the light cone, a key adjustment for optimizing contrast and resolution.
- Specimen Interaction: The focused light passes through the specimen, which is placed on a glass slide on the stage. As light passes through, it is absorbed, refracted, or diffracted by the structures within the specimen, encoding information about those structures into the light waves.
- Objective Magnification: The light exiting the specimen is captured by the objective lens, the most important component for determining image quality. The objective magnifies the image and projects a real, inverted intermediate image up into the microscope’s body tube.
- Eyepiece Viewing: This intermediate image is then magnified a second time by the eyepiece (or ocular lens), which functions like a magnifying glass. The eyepiece produces the final, enlarged virtual image that the observer sees.
The Pillars of Microscopy: Magnification, Resolution, and Contrast
While these three terms are often used together, they describe distinct and equally important aspects of image quality.
- Magnification: This is the most straightforward concept—it is the degree to which the microscope makes an object appear larger. The total magnification of a compound microscope is calculated by multiplying the magnification power of the objective lens by the power of the eyepiece lens. For example, a 10x eyepiece combined with a 40x objective lens yields a total magnification of 400x.
- Resolution (or Resolving Power): This is the true measure of a microscope’s performance. Resolution is defined as the ability to distinguish two closely spaced points as separate entities. If two points are closer together than the microscope’s limit of resolution, they will blur into a single point in the image. High resolution is what allows for the visualization of fine detail.
- Contrast: This refers to the difference in light intensity (brightness) between the specimen and its adjacent background. Many biological specimens, such as living cells, are largely transparent and absorb very little light. These “phase objects” are inherently low in contrast and appear almost invisible under standard brightfield microscopy, necessitating specialized contrast-enhancing techniques.
A common and critical misconception among new users is that higher magnification automatically means a better image. However, magnification without sufficient resolution is known as “empty magnification.” The image becomes larger but blurrier, revealing no additional detail. The factor that truly governs the level of detail a microscope can capture is its resolution, which is fundamentally determined by a property of the objective lens called numerical aperture.
The Key to Resolution: A Deep Dive into Numerical Aperture (NA)
The numerical aperture (NA) of a microscope objective is the single most important factor determining its resolving power. It is a dimensionless number, typically engraved on the side of the objective, that represents the objective’s ability to gather light and resolve fine specimen detail at a fixed distance. A higher NA results in better resolution.
The numerical aperture is defined by the following equation: NA=n⋅sin(μ)
Where:
- n is the refractive index of the imaging medium between the front lens of the objective and the specimen’s cover glass. The refractive index is a measure of how much a medium bends light. For air, n is approximately 1.00; for water, it is 1.33; and for specialized immersion oil, it is about 1.51.
- μ (mu) is half the angular aperture, which is the maximum angle of the cone of light that can enter the objective from the specimen.
The relationship between resolution (R) and NA is expressed by the Rayleigh criterion: R=NA0.61λ
Where λ (lambda) is the wavelength of light used for illumination. This equation clearly shows that to achieve better resolution (a smaller value for R), one must either use a shorter wavelength of light or, more practically, increase the numerical aperture of the objective.
This relationship explains the critical role of immersion oil. According to the NA formula, when the imaging medium is air (n=1.00), the maximum theoretical NA is 1.0 (since the maximum value of sin(μ) is 1). In practice, it is difficult to achieve an NA greater than 0.95 with a “dry” objective. To surpass this physical limit and achieve higher resolution, one must increase the refractive index of the medium between the lens and the specimen. Immersion oil, with a refractive index (n≈1.51) similar to that of the glass slide and coverslip, minimizes the refraction of light rays as they exit the specimen. This allows the objective to capture more light, particularly the highly oblique diffracted rays that carry the finest detail information, thus enabling a much higher NA (up to 1.4) and significantly better resolution. This is why high-magnification objectives (such as 60x and 100x) are designed as oil immersion objectives and are essential for fields like microbiology and hematology.
|
|

Note: Because immersion oil is a liquid and cannot be shipped by air or express, in our actual operations, if you purchase HINOTEK microscopes and transport them by air or express, we will not include immersion oil. You will need to purchase immersion oil locally.
To learn more about how to use microscope oil, please visit the page: Using the Oil Immersion Lens (Oil Immersion Microscopy).
Anatomy of the Workhorse: The Compound Light Microscope
A modern compound microscope is a precision instrument with numerous components working in concert. These parts can be broadly categorized into the optical system, which forms the image, and the mechanical system, which supports and aligns the optics.
The Optical System: The Path to Magnification
 |
-
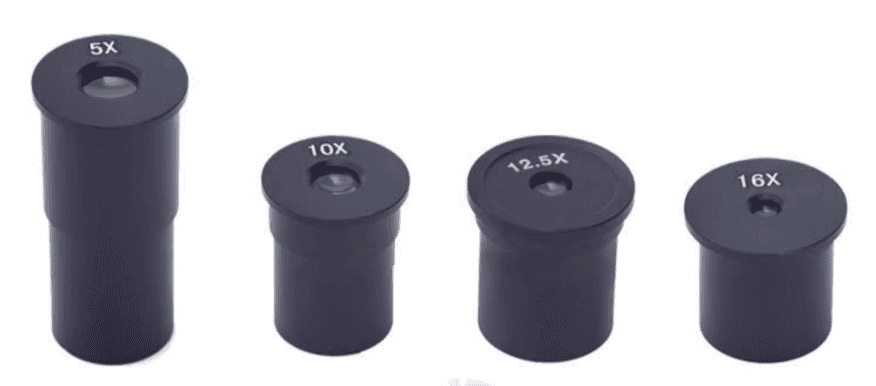
- Eyepiece (Ocular Lens): The lens assembly at the top of the microscope that the viewer looks through. Standard eyepieces typically provide 10x or 15x magnification. Binocular microscopes may feature a diopter adjustment on one eyepiece to compensate for differences in vision between the viewer’s eyes.
|
|

-
- Objective Lenses: Housed in the rotating nosepiece, these are the primary lenses responsible for image formation and resolution. A standard microscope has three to five objectives of varying powers, such as 4x (scanning), 10x (low power), 40x (high power), and 100x (oil immersion).
 |
 |
 |
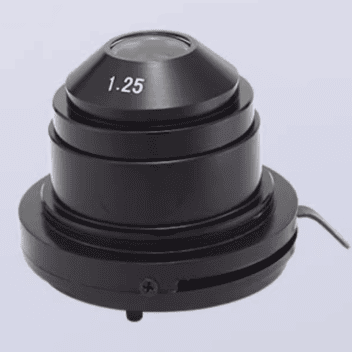
- Condenser: A lens system located beneath the stage that gathers light from the illuminator and concentrates it onto the specimen. A high-quality, adjustable condenser (like an Abbe condenser) is crucial for achieving optimal illumination and resolution, especially at high magnifications.
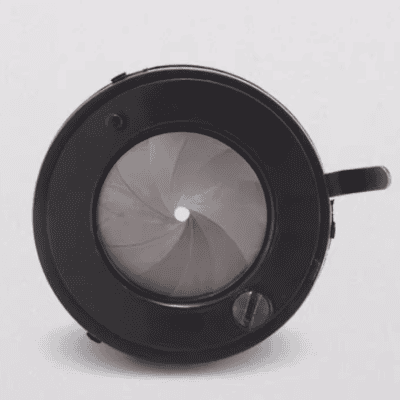
- Diaphragms: Microscopes have two key diaphragms. The aperture diaphragm (or iris diaphragm) is located within the condenser and controls the angle of the cone of light reaching the specimen, affecting contrast and depth of field. The field diaphragm is located near the light source and controls the diameter of the illuminated field of view, helping to reduce stray light and improve image contrast.
The Mechanical System: The Framework for Viewing
 |
- Head (or Body): The upper part of the microscope that contains the eyepieces and prisms. Heads can be monocular (one eyepiece), binocular (two eyepieces for comfortable viewing), or trinocular (two eyepieces plus a third port for mounting a camera).
- Arm: The structural element that connects the head to the base of the microscope. It is also used as a handle for carrying the instrument.
- Base: The heavy, supportive bottom of the microscope that provides stability and houses the illuminator.
- Stage: The flat platform where the specimen slide is placed. Many microscopes feature a mechanical stage, which has controls to move the slide precisely along the X and Y axes. Stage clips hold the slide securely in place.
- Focus Knobs: These knobs move the stage up and down to focus the image. The coarse focus knob is the larger knob used for rapid, large-scale focusing, typically only with low-power objectives. The fine focus knob is the smaller knob used for precise, small-scale adjustments to achieve a sharp image, especially at high magnifications.
- Revolving Nosepiece (or Turret): A rotating turret that holds the objective lenses, allowing the user to easily switch between different magnifications.
- Illuminator: The built-in light source, which is typically a low-voltage halogen bulb or an LED.
| Component | Function |
| Eyepiece (Ocular Lens) | Magnifies the intermediate image produced by the objective lens; the part the user looks through. |
| Objective Lenses | The primary lenses that collect light from the specimen and form the initial magnified image. |
| Revolving Nosepiece | A rotating mount that holds the objective lenses, allowing for easy change of magnification. |
| Stage | The platform where the specimen slide is placed for observation. |
| Mechanical Stage | A mechanism on the stage that holds the slide and allows for precise movement in the X and Y directions. |
| Condenser | A lens system below the stage that gathers and focuses light from the illuminator onto the specimen. |
| Aperture Diaphragm | An adjustable iris within the condenser that controls the numerical aperture of the illumination, affecting contrast and resolution. |
| Illuminator | The light source for the microscope, typically a halogen lamp or LED located in the base. |
| Coarse Focus Knob | Moves the stage up or down in large increments to bring the specimen into general focus (used with low power). |
| Fine Focus Knob | Moves the stage in very small increments to achieve sharp, detailed focus (used with all powers). |
| Head | The upper part of the microscope that holds the eyepiece(s). Can be monocular, binocular, or trinocular. |
| Arm | Connects the head to the base and serves as a carrying handle. |
| Base | The supportive bottom of the microscope that provides stability and houses the illuminator. |
A Spectrum of Vision: Types of Optical Microscopes and Contrast Techniques
Optical microscopy is not a single technique but a family of methods, each designed for different types of specimens and applications. The two most fundamental types of microscopes are the compound and stereo microscopes, while a variety of contrast-enhancing techniques can be applied to reveal details in otherwise challenging samples.
Foundational Microscope Types
The most basic distinction in optical microscopy is between compound and stereo microscopes, which are designed for entirely different scales of observation.
|
|

-
- The Compound Microscope: Also known as a biological microscope, this is the classic high-power instrument used for viewing specimens that are too small to see with the naked eye. It uses a series of lenses to achieve high magnification (typically 40x to 1000x) and provides high resolution. It relies on transmitted light, meaning light must pass through the specimen to form an image. This requires the specimen to be very thin, often prepared as a slice on a glass slide. The resulting image is two-dimensional (2D) and inverted. It is the standard tool for examining cells, bacteria, and thin tissue sections.
|
|

- The Stereo Microscope: Also called a dissecting microscope, this is a low-power instrument designed for observing larger, three-dimensional objects. It provides lower magnification (typically 7x to 80x) but features a long working distance (the space between the objective and the specimen) and a greater depth of field (the thickness of the specimen that appears in focus at one time). Its defining feature is its use of two separate optical paths—one for each eye—which provides a true three-dimensional (stereoscopic) image that is upright and correctly oriented. It primarily uses
reflected light (light shining down onto the specimen), making it ideal for viewing and manipulating opaque objects like insects, electronic components, fossils, or jewelry.
A frequent point of confusion for buyers is the difference between a binocular and a stereo microscope. While both have two eyepieces, their optical systems are fundamentally different. A binocular compound microscope uses a single objective lens, and the image is simply split by a prism to be viewed with both eyes for comfort; the image remains 2D.
Stereo microscope has two objectives and two complete optical paths, creating a true 3D image by presenting a slightly different perspective to each eye. Understanding this distinction is crucial for selecting the right instrument for a given task.
| Feature | Compound Microscope | Stereo Microscope |
| Magnification Range | High (e.g., 40x – 1000x) | Low (e.g., 2x – 100x) |
| Image Type | 2D, inverted, and reversed | 3D, upright, and correctly oriented |
| Primary Illumination | Transmitted light (light passes through) | Reflected light (light shines on) |
| Working Distance | Short | Long |
| Depth of Field | Shallow | Deep |
| Typical Applications | Viewing cells, bacteria, thin tissue slices | Dissecting, viewing insects, circuits, fossils, quality control |
|
|

The polarization microscope: Also known as a polarizing microscope, is a specialized type of light microscope used to study materials with anisotropic properties. It uses polarized light to reveal details about the optical properties, crystal structure, and composition of a specimen. By inserting polarizers and analyzers into the light path, it can identify materials that exhibit birefringence, making it an essential tool in geology, mineralogy, and material science.
|
|

The fluorescence microscope is a powerful tool in biology and material science that uses a high-intensity light source to excite a specimen. The specimen, which has been stained with a fluorescent dye (fluorophore), absorbs this light and then emits light of a longer wavelength. This emitted light is what forms the magnified image, allowing researchers to visualize specific molecules, proteins, or cellular structures with high specificity and contrast against a dark background. It’s particularly useful for observing dynamic processes in living cells.
|
|

An inverted microscope is a type of light microscope where the light source and condenser are located above the specimen, while the objective lenses are positioned below the stage. This unique design allows scientists to observe living cells and organisms in their natural environment, such as in a petri dish or a tissue culture flask, from underneath. The fixed stage provides stability, which is ideal for tasks like micromanipulation and time-lapse imaging, making it a crucial tool in cell biology, neuroscience, and in vitro fertilization.
|
|

A metallurgical microscope, also known as a materials microscope, is a specialized light microscope designed for examining opaque materials like metals, alloys, ceramics, and polymers. Unlike a biological microscope that uses transmitted light, a metallurgical microscope uses reflected light from an integrated illumination system. This allows it to reveal the microstructure, grain size, surface defects, and other features of polished and sometimes etched material surfaces, making it an essential tool for quality control and research in fields such as metallurgy, materials science, and forensics.
Enhancing the View: A Guide to Optical Contrast Methods
For many biological specimens that are transparent and unstained, standard brightfield illumination provides poor visibility. To overcome this, several contrast-enhancing techniques have been developed.
- Brightfield Microscopy: This is the most basic and common technique. The specimen is illuminated by a full cone of light from the condenser, and contrast is generated by the absorption of light by pigmented or stained parts of the specimen. The image appears as dark or colored structures on a bright white background. While simple, it is ineffective for unstained, transparent samples.
- Darkfield Microscopy: In this technique, a special stop in the condenser blocks the central rays of light, illuminating the specimen only with oblique rays that form a hollow cone of light. These rays do not enter the objective lens directly, so the background appears dark. Only light that is scattered or diffracted by the specimen enters the objective to form an image. The result is a bright specimen against a black background. Darkfield is excellent for revealing the outlines of unstained, transparent specimens like living bacteria, protists, and diatoms.
- Phase Contrast Microscopy: Developed by Frits Zernike (for which he won the Nobel Prize), this ingenious technique converts invisible phase shifts into visible changes in brightness. When light passes through a transparent specimen, its phase is slightly shifted relative to the light that passes through the surrounding medium. The microscope uses a special
condenser annulus and a phase plate inside the objective to exaggerate this phase difference and cause destructive interference. This makes different parts of the specimen appear darker or lighter based on their refractive index, revealing significant internal detail in living, unstained cells. Its main drawback is the appearance of “halos” or bright outlines around objects. - Differential Interference Contrast (DIC) Microscopy: Also known as Nomarski microscopy, DIC is another powerful technique for visualizing unstained, transparent specimens. It uses polarizers and special prisms (Nomarski prisms) to split a polarized light beam into two slightly displaced beams that pass through adjacent points in the specimen. When the beams are recombined, differences in their optical path lengths (due to variations in the specimen’s thickness or refractive index) create interference. This produces a high-resolution, high-contrast image with a characteristic pseudo-3D, shadow-cast appearance that highlights edges and gradients. A key advantage of DIC over phase contrast is that it does not produce halos and offers excellent optical sectioning capabilities at high numerical apertures.
| Technique | Principle | Image Appearance | Best For | Limitations |
| Brightfield | Contrast from light absorption by the specimen. | Dark or colored object on a bright background. | Stained or naturally pigmented specimens. | Very low contrast for unstained, transparent specimens. |
| Darkfield | Illumination with oblique rays; only scattered light is collected. | Bright object on a dark background. | Unstained, transparent specimens like live bacteria, diatoms, fibers. | Sensitive to dust; image can be difficult to interpret. |
| Phase Contrast | Converts phase shifts into amplitude (brightness) differences. | Gray-scale image with varying brightness based on refractive index. | Unstained living cells and thin tissues, revealing internal structures. | Produces “halo” artifacts around objects. |
| Differential Interference Contrast (DIC) | Uses prisms to create interference based on optical path gradients. | High-contrast, pseudo-3D, shadow-cast image. | Unstained living cells, tissues; provides excellent optical sectioning. | Requires specialized, more expensive components. |
Illuminating Specificity: Advanced Microscopy Techniques
Beyond general contrast enhancement, some techniques use the properties of light and matter to visualize specific molecules or achieve resolution beyond the classical diffraction limit.
- Confocal Microscopy: Laser scanning confocal microscopy is an advanced form of fluorescence microscopy that provides exceptional image clarity and the ability to create 3D reconstructions. It uses a focused laser beam to excite fluorescence in a single, tiny spot within the specimen at a time. Crucially, it employs a pinhole aperture in front of the detector that is “confocal” with the illuminated spot. This pinhole physically blocks any out-of-focus fluorescence from reaching the detector. By scanning the laser spot across the specimen, a sharp, blur-free “optical section” is generated. By collecting a series of these sections at different depths (a z-stack), a computer can reconstruct a highly detailed 3D image of the specimen.
The Microscope in Action: Applications Across Disciplines
The theoretical principles and diverse techniques of microscopy come to life in its myriad applications, which span nearly every field of science and industry. The choice of microscope and technique is always dictated by the specific question being asked and the nature of the sample being examined.
Biology and Medicine
In the life sciences, the microscope is arguably the most fundamental research tool.
- Disease Diagnostics: Microscopy is the bedrock of pathology and hematology. Pathologists examine stained tissue sections (histology) with brightfield microscopes to diagnose cancer and other diseases based on cellular abnormalities. Similarly, blood smears are analyzed to identify infections, anemia, and leukemia. Darkfield microscopy can be used to identify certain bacteria, like the spirochete that causes syphilis.
- Microbiology and Virology: The study of bacteria, fungi, protists, and other microorganisms relies entirely on microscopy. Phase contrast and DIC are invaluable for observing the behavior of living, unstained microbes, while fluorescence microscopy can identify specific species or cellular processes. Electron microscopes are required to visualize viruses, which are too small to be resolved by light microscopy.
- Cell Biology and Research: Researchers use a full suite of microscopy techniques to explore the intricate world of the cell. Phase contrast and DIC are used to study the dynamics of living cells, such as cell division and movement. Fluorescence and confocal microscopy allow for the precise localization of proteins and organelles, enabling the mapping of cellular pathways and the study of gene expression.
- Drug Development and Pharmacology: Microscopes are essential for developing and testing new drugs. Scientists can observe how a potential drug affects cell structure, growth, and behavior in real-time, providing critical data on its efficacy and potential toxicity.
- Minimally Invasive Surgery: Specialized microscopes and endoscopic cameras are used in surgeries like laparoscopy, allowing surgeons to view internal organs with high magnification through small incisions, leading to reduced recovery times and complications.
Materials Science and Industrial Inspection
In industrial settings, microscopy is a critical tool for quality control, research and development, and failure analysis.
- Quality Control: Stereo and compound microscopes are used extensively on production lines and in quality assurance labs. Applications include inspecting the integrity of solder joints on printed circuit boards (PCBs), verifying the surface finish of precision-machined parts, checking for defects in medical devices, and ensuring the quality of textiles and plastics.
- Failure Analysis: When a component or material fails, microscopy is used to determine the cause. High-magnification optical and electron microscopes can reveal microscopic cracks, fatigue lines, corrosion pits, and other tell-tale signs of failure, providing crucial information for improving designs and processes.
- Microstructure Analysis: The properties of materials like metals, alloys, ceramics, and polymers are determined by their internal microstructure. Metallurgists use reflected light microscopy with techniques like brightfield, darkfield, and DIC to examine the size and shape of crystal grains, identify different phases, and detect inclusions or impurities.
Beyond the Lab
The utility of the microscope extends far beyond traditional research and industrial labs.
- Forensic Science: Forensic labs use comparison microscopes (two microscopes linked to one eyepiece) to compare evidence like bullets, tool marks, hairs, and fibers. Other microscopic techniques are used to analyze paint chips, soil, and gunshot residue.
- Environmental Science: Microscopes are used to identify and count microorganisms in water samples to assess water quality, analyze particulate matter in air pollution studies, and examine the mineral composition of soil.
- Art Conservation and Authentication: Art historians and conservators use stereo microscopes to examine the fine details of brushstrokes, pigments, and canvas weaves. Microscopic analysis of paint layers can help authenticate a piece of art or guide its restoration.
- Education: From elementary schools to universities, the microscope is a fundamental teaching tool that provides students with their first direct glimpse into the invisible world of biology and science.
Practical Microscopy: A User’s Handbook
Beyond understanding the theory, proficiency in microscopy requires practical skill in its use, maintenance, and selection. This section provides a handbook for laboratory professionals.
How to Use a Compound Light Microscope: A Step-by-Step Guide
Following a systematic procedure ensures successful viewing and protects the instrument from damage.
- Preparation and Safety: Always carry the microscope with two hands—one on the arm and one supporting the base. Place it on a stable, level surface. Plug it in and turn on the illuminator.
- Start at Low Power: Rotate the revolving nosepiece to select the lowest power objective (e.g., 4x). It is the shortest objective and provides the widest field of view, making it easiest to find the specimen.
- Position the Slide: Prepare your specimen on a slide with a coverslip. Place the slide on the stage and secure it with the stage clips, centering the specimen over the aperture in the stage.
- Initial Focusing: While looking at the stage from the side (not through the eyepiece), turn the coarse focus knob to raise the stage as high as it will go without touching the objective lens. This prevents crashing the lens into the slide.
- Achieve Focus: Now, look through the eyepiece(s). Slowly turn the coarse focus knob in the opposite direction, lowering the stage away from the objective, until the image comes into view. The image will likely be blurry at first.
- Sharpen the Image: Use the fine focus knob to make small adjustments until the image is perfectly sharp.
- Center the Specimen: Move the slide using the mechanical stage controls so that the specific area you want to examine is in the exact center of your field of view. Remember that the image is inverted; moving the slide right makes the image move left, and moving it up makes the image move down.
- Increase Magnification: Rotate the nosepiece to the next higher power objective (e.g., 10x). The objectives on a quality microscope are parfocal, meaning the image should remain nearly in focus.
- Refocus at Higher Power: Use only the fine focus knob to bring the image back into sharp focus. Never use the coarse focus knob at high power (40x or 100x), as this can easily crash the objective into the slide, damaging both.
- Adjust Illumination: As you increase magnification, the field of view becomes darker. You may need to increase the illuminator intensity or open the aperture diaphragm to achieve optimal contrast and brightness.
- Using Oil Immersion (100x): If using the 100x objective, first focus at 40x. Then, rotate the nosepiece halfway between the 40x and 100x objectives, place a single drop of immersion oil directly on the coverslip over the area of interest, and carefully click the 100x objective into place. The tip of the lens should be immersed in the oil. Refocus using only the fine focus knob.
Choosing the Right Microscope for Your Laboratory: A Buyer’s Guide
Selecting the appropriate microscope is a critical investment. The decision should be driven by application needs rather than specifications alone.
- Primary Application: This is the most important factor. Will you be viewing live, unstained cells in a culture dish (requiring an inverted microscope with phase contrast or DIC)? Or stained tissue sections on slides (requiring an upright compound microscope with brightfield)? Or assembling small electronic parts (requiring a stereo microscope with a long working distance)?.
- Optical Quality: Do not be swayed by high magnification alone. Look for high-quality objectives. Achromatic objectives are standard and correct for color aberration. For more demanding research and photography, Plan or Semi-Plan objectives provide a much flatter field of view with fewer distortions from edge to edge. The objective’s Numerical Aperture (NA) is a direct indicator of its resolving power.
- Head Configuration (Monocular, Binocular, Trinocular):
- Monocular: Suitable for basic use and tight budgets, but can cause eye strain over long periods.
- Binocular: The standard for professional use, offering much greater comfort for extended viewing sessions.
- Trinocular: Essential for any application that requires documentation, teaching, or digital analysis. It provides a dedicated third port for mounting a digital camera without interrupting viewing through the eyepieces.
- Quality of Construction: A durable microscope should have a solid, heavy metal frame for stability. Internal optics should use high-quality glass prisms rather than mirrors. The mechanics of the focus knobs and stage should be smooth and precise.
- Illumination Type: Tungsten is basic and found on older or very low-cost models. Halogen provides bright, white light and is a good standard for laboratory work. LED illumination is increasingly popular as it is cool (preventing heat damage to live specimens), energy-efficient, has an extremely long lifespan, and often allows for cordless, rechargeable operation.
Tips: 5 Core Terms You Need to Know for Better Microscopy Imaging.
Ensuring Longevity and Performance: A Microscope Care and Maintenance Checklist
Proper maintenance is essential to protect your investment and ensure reliable, high-quality performance for years.
Daily Care
- Turn off the illuminator when finished.
- Use an air blower to gently remove any loose dust from optical surfaces.
- If using an oil immersion objective, clean the oil off immediately after use.
- Lower the stage and rotate the lowest-power objective into position.
- Cover the microscope with a dust cover when not in use. Dust is the number one enemy of optical instruments.
Weekly/Monthly Cleaning
- Optics: Clean eyepieces and objectives only when necessary. First, use an air blower to remove dust. If smudges remain, use a piece of professional lens paper moistened with a specialized lens cleaning solution (e.g., a mix of isopropanol and ether, or a commercial cleaner). Wipe in a gentle, spiral motion from the center outwards. Never use regular tissues, paper towels, or cloth, as they contain abrasive fibers that will scratch the lens coatings. Never apply cleaning fluid directly to the lens.
- Body: Wipe down the microscope stand, stage, and knobs with a soft, lint-free cloth.
Handling Immersion Oil
- Clean Immediately: This cannot be overstressed. Wipe the objective with a clean, dry piece of lens paper immediately after use. If the oil has started to dry, use lens paper moistened with a recommended oil solvent (like isopropanol or a specialized cleaner). Aqueous solutions are ineffective.
- Prevent Damage: Hardened oil is extremely difficult to remove and can permanently damage the anti-reflective coating on the objective lens, severely degrading image quality.
Proper Storage and Transport
- Storage: Store the microscope in a clean, dry, low-humidity environment. Always use a dust cover. For long-term storage, place it in its original case or a sealed plastic bag with a desiccant packet to prevent fungal growth.
- Transport: Use the original padded case. If one is not available, remove all removable components (objectives, eyepieces) and pack them separately. Secure all moving parts like the stage. Carry the main stand with two hands and avoid any shocks or vibrations.
Conclusion: The Enduring Vision of Microscopy
From the simple lens arrangements of the 16th century to the sophisticated digital and laser-based systems of the 21st, the microscope has remained a central and transformative tool in science and technology. Its evolution is a testament to human curiosity—the relentless drive to see beyond the visible and understand the fundamental workings of our world. It has allowed us to identify the agents of disease, manipulate the building blocks of life, and engineer materials with unprecedented precision.
The principles of magnification, resolution, and contrast remain the bedrock of optical microscopy, while innovations in techniques like phase contrast, DIC, fluorescence, and confocal imaging continually push the boundaries of what we can visualize. Today, as microscopy integrates with artificial intelligence for automated image analysis and super-resolution techniques break the long-held diffraction limit of light, its role as an engine of discovery is more vital than ever. The microscope does more than just magnify; it provides vision, fuels inquiry, and empowers the progress that shapes our future.
References
If you are ready to find the right Microscope for your laboratory, please browse our complete product range: Microscope
Any question, contact us by email: [email protected]
This guide is maintained by HINOTEK’s core technical team, comprised of senior engineers and application scientists with over two decades of hands-on experience in fields such as microscopy, centrifugation, and spectrophotometry. We are committed to ensuring that every piece of information in this guide—from instrument principles and technical specifications to laboratory procurement advice—maintains the highest level of accuracy and timeliness.
This content is regularly reviewed and updated to reflect the latest industry standards and technological advancements. We value feedback from the global scientific community. Should you have any questions or suggestions, or wish to discuss any technical details, please do not hesitate to contact our expert team at [email protected].
Works cited
- General Science – Fetena.net, 2025, https://fetena.net/books_asset/books_25/collection/grade%207-general%20science_fetena_net_ff42.pdf
- The Role of Microscopes in Medical Research and Diagnostics …, https://www.magnusopto.com/blog/post/the-role-of-microscopes-in-medical-research-and-diagnostics.html
- History of the Microscope | PPT – SlideShare, https://www.slideshare.net/ihmcbiology1213/history-of-the-microscope-13747829
- A Comprehensive Guide to the Light Microscope – How to Use a …, https://www.microscopeworld.com/p-4463-a-comprehensive-guide-to-the-light-microscope-how-to-use-a-light-microscope.aspx
- principles of light microscopy – Maharaja College , Ara, https://maharajacollege.ac.in/fileupload/uploads/67a1e671983ed2025020410053760d1b2c08779d20210622095200principles%20and%20application%20of%20light%20microscope.pdf
- Compound Microscope Parts, Functions, and Labeled Diagram …, https://microscopeinternational.com/compound-microscope-parts/
- 3.1D: Magnification and Resolution – Biology LibreTexts, https://bio.libretexts.org/Bookshelves/Microbiology/Microbiology_(Boundless)/03%3A_Microscopy/3.01%3A_Looking_at_Microbes/3.1D%3A_Magnification_and_Resolution
- bio.libretexts.org, https://bio.libretexts.org/Bookshelves/Microbiology/Microbiology_(Boundless)/03%3A_Microscopy/3.01%3A_Looking_at_Microbes/3.1D%3A_Magnification_and_Resolution#:~:text=Magnification%20is%20the%20ability%20to,its%20resolution%20and%20its%20magnification.
- Numerical Aperture and Resolution – Evident Scientific, https://evidentscientific.com/en/microscope-resource/knowledge-hub/anatomy/numaperture
- Optical Contrast Methods | Learn & Share – Leica Microsystems, https://www.leica-microsystems.com/science-lab/microscopy-basics/optical-contrast-methods/
- Advanced Light Microscopy & Image Analysis Glossary | New York State Department of Health, Wadsworth Center, https://wadsworth.org/research/cores/alm/glossary
- Phase Contrast and Microscopy | Learn & Share – Leica Microsystems, https://www.leica-microsystems.com/science-lab/microscopy-basics/phase-contrast-and-microscopy/
- Molecular Expressions Microscopy Primer: Anatomy of the …, https://micro.magnet.fsu.edu/primer/anatomy/numaperture.html
- Parts of A Compound Microscope | PDF | Lens (Optics) | Natural Philosophy – Scribd, https://www.scribd.com/document/433361782/Parts-of-a-Compound-Microscope
- What are the major types of optical microscopes? – Celestron, https://www.celestron.com/blogs/knowledgebase/what-are-the-major-types-of-optical-microscopes