 |
The Kjeldahl Method & Kjeldahl Nitrogen Analyzer: A Foundational Technique for Nitrogen Analysis
For more than 140 years, the Kjeldahl method has served as the definitive reference standard for the analysis of nitrogen in a wide array of organic and inorganic materials. Developed in 1883 by Danish chemist Johan Kjeldahl to measure protein content in malt for the brewing industry, its robustness and precision have made it the benchmark against which other nitrogen analysis techniques are judged. Today, it is the officially recognized method by international regulatory bodies including AOAC International, the International Organization for Standardization (ISO), and the Environmental Protection Agency (EPA).
While the fundamental chemistry of the method has remained constant, its practical application has undergone a significant transformation. The original procedure was a labor-intensive and hazardous manual process involving open flasks and corrosive reagents. Modern laboratories, however, utilize sophisticated Kjeldahl nitrogen analyzer (View HINOTEK Kjeldahl nitrogen analyzer Category) that automate these steps, drastically improving safety, speed, and reproducibility. This continuous technological innovation built around a sound scientific principle is the reason for the method’s enduring relevance. The modern Kjeldahl Nitrogen Analyzer is the key that unlocks the power of this proven chemical technique, making it suitable for the demands of high-throughput quality control and research labs worldwide.
How It Works: The Chemistry Behind Kjeldahl Nitrogen Analyzer
The core principle of the Kjeldahl method is to convert all organically bound nitrogen within a sample into ammonium sulfate. This stable inorganic compound can then be isolated as ammonia gas and precisely quantified through titration. This process unfolds across three distinct chemical stages: digestion, distillation, and titration.
Part 1: Digestion (Conversion)
 |
The primary goal of the digestion stage is to break down the complex sample matrix—whether it’s food, soil, or a pharmaceutical compound—and convert all the organically bound nitrogen into ammonium ions (NH4+) trapped in solution as ammonium sulfate. This is achieved by boiling the sample at high temperatures in the presence of three key reagents:
- Concentrated Sulfuric Acid (H2SO4): This is the primary digestion reagent. It is a strong oxidizing agent that dehydrates and carbonizes the organic material, liberating the nitrogen.
- Salt (Potassium Sulfate, K2SO4): This salt is added to elevate the boiling point of the sulfuric acid from approximately 337°C to a more effective digestion temperature of around 370-410°C. This higher temperature significantly accelerates the decomposition of the sample.
- Catalyst (e.g., Copper Sulfate, CuSO4, or Selenium): A metallic catalyst is used to increase the rate of the oxidation reaction, ensuring a more rapid and complete digestion.
During this process, the organic sample chars and blackens before gradually clearing as the organic matter is converted to carbon dioxide and water, and the nitrogen is converted to ammonium sulfate. The general chemical reaction can be summarized as:
Part 2: Distillation (Separation)
|
Once digestion is complete, the nitrogen is securely held as ammonium ions in an acidic solution. The goal of distillation is to separate this nitrogen from the digestate by converting it into a volatile gas.
This is a two-step process. First, the cooled acid digestate is diluted with ammonia-free water. Then, a concentrated strong base, typically sodium hydroxide (NaOH), is added. This addition raises the solution’s pH dramatically, shifting the chemical equilibrium from the stable, non-volatile ammonium ion (NH4+) to volatile ammonia gas (NH3).
The flask is then heated, and steam is passed through the solution. This steam distillation efficiently carries the liberated ammonia gas out of the digestion mixture and into a condenser. The chemical reaction for this liberation is:
Part 3: Titration (Quantification)
 |
The final stage is to capture and measure the amount of distilled ammonia gas. The quantity of ammonia is directly proportional to the amount of nitrogen in the original sample. While several methods exist, the direct titration method using boric acid is the most common in modern automated analyzers.
This preference is not arbitrary; it represents a significant advancement in laboratory efficiency. Older back-titration methods required two separate, precisely standardized solutions (an acid and a base), increasing preparation time, cost, and potential for error. The boric acid method, however, only requires one standard solution—the titrant—making the entire workflow simpler, cheaper, and more robust.
Here is how the boric acid method works:
- Ammonia Capture: The outlet of the condenser is submerged in a receiving flask containing a solution of boric acid (H3BO3) and a pH indicator. As the ammonia gas bubbles through, it is trapped, forming an ammonium-borate complex. This causes the pH of the solution to rise, resulting in a distinct color change of the indicator. The capture reaction is:
NH3+H3BO3→NH4++H2BO3−
- Titration: The solution in the receiving flask is then titrated with a standardized strong acid, such as hydrochloric acid (HCl) or sulfuric acid (H2SO4). The acid neutralizes the ammonium-borate complex, returning the solution to its original pH. The precise moment of neutralization, known as the endpoint, is signaled by a reverse color change of the indicator. The titration reaction is:
2NH4++2H2BO3−+H2SO4→(NH4)2SO4+2H3BO3
The volume of standardized acid required to reach the endpoint is precisely measured. This volume is then used to calculate the original nitrogen content of the sample.
It is important to note that some customers mistakenly believe that purchasing a Kjeldahl Nitrogen Analyzer alone will automatically complete all three stages. In reality, these stages are typically carried out by either three instruments (such as the SH420F Kjeldahl Digestion System + K9840 Kjeldahl Distillation Unit + T860 Automatic Titrator) or two instruments (such as the SH420F Kjeldahl Digestion System + K1100F Automatic Kjeldahl Analyzer).
Anatomy of a Modern Kjeldahl Nitrogen Analyzer
A modern Kjeldahl nitrogen analyzer is a fully integrated system designed to automate the chemical process while addressing every major drawback of the traditional manual method: danger, imprecision, and slow throughput. Each component is an engineered solution to a specific historical problem.
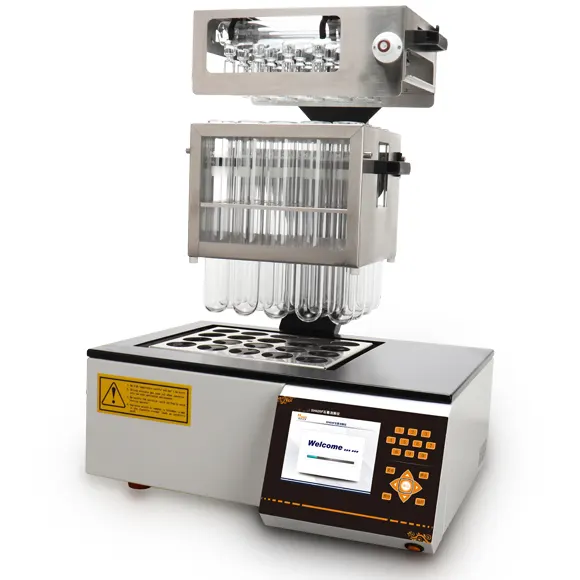
The Digestion Unit: Precision and Control
Manual heating with gas burners was inconsistent and a common source of error. Modern digestion units solve this with precisely controlled heating technology.
- Heating Block: These units use a solid block of aluminum or graphite with multiple positions for digestion tubes. This design ensures outstanding thermal homogeneity and stability across all samples, which is essential for reproducible results.
- Microprocessor Control: A PID (proportional-integral-derivative) controller precisely manages the heating profile, allowing for programmable temperature ramps and holds with an accuracy of ±0.5°C. This prevents the two main digestion errors: under-heating, which leads to incomplete digestion, and over-heating (above 420°C), which can cause loss of nitrogen.
- Automated Lifts: Fully automated systems feature a motorized lift that lowers and raises the sample rack into the heating block. This eliminates manual handling of hot, heavy racks of acid-filled tubes, significantly improving operator safety.
The Fume Management System: Operator Safety
The digestion process produces dense, highly corrosive fumes of sulfuric acid, which are a serious health hazard. Modern systems are designed to contain and neutralize these fumes completely.
- Exhaust Manifold: A suction cap fits securely over the top of the digestion tubes, capturing all vapors at the source before they can escape into the lab environment.
- Scrubber Unit: The captured fumes are drawn into a separate scrubber unit. This device typically uses a two-stage process: first, the gases are passed through water to cool them and trap some of the acid, and second, they are bubbled through a sodium hydroxide solution to neutralize the remaining acid fumes. This ensures that only clean air is released, protecting both the operator and the laboratory infrastructure.
The Distillation Unit: Efficiency and Safety
The distillation stage involves boiling alkaline solutions and handling steam, which presented significant safety risks in manual setups. Modern distillation units incorporate patented technologies to make the process safe, fast, and efficient.
- Steam Generator: Many modern analyzers feature a patented, maintenance-free steam generator that operates without being under pressure. This is a critical safety feature that eliminates the risk of explosion associated with older pressurized boiler designs.
- Titanium Condenser: The use of a titanium condenser provides superior chemical resistance and highly efficient thermal exchange. This allows the hot distillate to be cooled rapidly to a safe temperature (below 35°C) while using minimal cooling water, reducing operational costs.
- Durable Splash Head: A technopolymer splash head prevents alkaline mist from being carried over with the steam, which would otherwise contaminate the receiving solution and cause inaccurate results. This material is highly resistant to chemicals, ensuring a long service life.
- Automated Reagent Dosing: High-precision pumps automatically dispense the required volumes of dilution water and sodium hydroxide. This removes the potential for human error in reagent addition and ensures consistent, optimal conditions for every analysis.
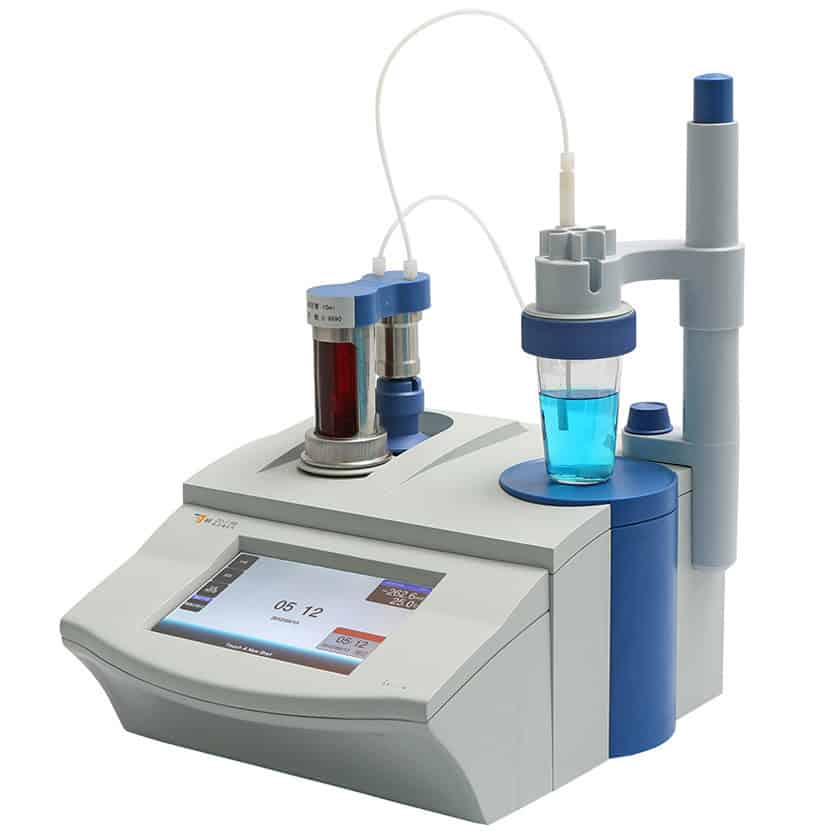
The Titration System: Unmatched Precision
Manually judging the color change of an indicator during titration is subjective and a source of variability. Automated titration systems remove this guesswork, providing objective and highly precise endpoint detection.
- Integrated Colorimetric Titrator: This is the most advanced option, where the titration system is built directly into the distillation unit. It uses an RGB color sensor to precisely detect the subtle color shift of the indicator at the endpoint. This method is recommended by the AOAC for its high accuracy and reproducibility.
- Potentiometric Titration: An alternative system uses a pH electrode to monitor the pH of the receiving solution during titration. The endpoint is determined when a specific pH value is reached. This is often done with an external titrator connected to the distillation unit.
Software and Connectivity: The Brain of the Kjeldahl Nitrogen Analyzer
Modern analyzers are controlled by sophisticated software that streamlines the entire workflow. This software allows users to create and store methods, automatically calculates and reports results, and ensures compliance with regulatory standards such as FDA 21 CFR Part 11. Connectivity to a Laboratory Information Management System (LIMS) allows for seamless data transfer, eliminating manual data entry and enhancing data integrity.
A Practical Guide to operate a Kjeldahl Nitrogen Analyzer
While modern analyzers automate most of the chemical process, accurate results begin with meticulous work before the sample ever enters the machine. No amount of instrumental precision can compensate for a poorly prepared sample.
Step 0: The Foundation – Sample Preparation
This is the most critical step for achieving accurate and repeatable results. The small amount of sample analyzed (typically around 1 gram) must be perfectly representative of the entire batch it came from.
- Homogenization: Solid samples, such as grains or feed, must be ground to a fine, consistent powder with a particle size of less than 1 mm. This ensures that the sulfuric acid can fully penetrate and digest the material. Semi-solid samples like meat or cheese should be thoroughly minced or processed in a homogenizer.
- Weighing: Using an analytical balance with an accuracy of 0.1 mg, carefully weigh the homogenized sample. This can be done on nitrogen-free weighing paper, which is then folded and dropped into the digestion tube, or by taring the digestion tube on the balance and adding the sample directly, a common practice for liquid or semi-solid samples.
Step 1: Digestion
- Place the weighed sample into a clean, dry Kjeldahl digestion tube.
- Add the appropriate catalyst tablets and a precise volume of concentrated sulfuric acid (e.g., 12–20 ml).
- Load the rack of tubes into the digestion block and secure the fume exhaust manifold.
- Select and run the pre-programmed heating method on the analyzer. The solution will initially turn black as the organic matter carbonizes, then gradually clear to a transparent, often blue-green color, indicating that digestion is complete.
- Once the program finishes, the system will automatically lift the rack and allow the tubes to cool completely.
Step 2: Distillation and Ammonia Capture
- Place a receiving flask containing boric acid solution and indicator under the condenser outlet of the distillation unit. Ensure the delivery tip is submerged below the surface of the liquid to prevent any loss of ammonia gas.
- Carefully load a cooled digestion tube into the distillation unit.
- Initiate the analysis. The instrument will automatically perform the following sequence:
- Dilute the concentrated digestate with a set volume of deionized water.
- Add a sufficient volume of concentrated sodium hydroxide to make the solution strongly alkaline.
- Begin steam distillation. As ammonia gas is driven over and captured by the boric acid, the receiving solution will change color (e.g., from pink to green).
Step 3: Titration
In a fully automated system, the titration process is integrated with the distillation.
- The titrator automatically adds a standardized acid titrant to the receiving flask.
- As the titrant neutralizes the captured ammonia, the indicator color reverses.
- The instrument’s optical or potentiometric sensor detects the exact endpoint of the titration and records the volume of titrant consumed.
Tips: Kjeldahl vs. Dumas Nitrogen Analyzer: What Are the Key Differences?
Step 4: Calculation of Results
The analyzer’s software automatically uses the recorded titrant volume to calculate the final results. Understanding the formulas behind these calculations is crucial for quality control.
- Nitrogen Percentage (%N): The calculation must account for the reagent blank—a test run with all reagents but no sample. The blank value corrects for any trace nitrogen present in the chemicals or absorbed from the atmosphere, isolating the nitrogen that came only from the sample. This is a fundamental quality control step that ensures accuracy. The formula is:
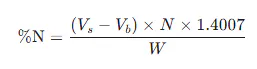
Where:
- Vs = Volume of titrant for the sample (ml)
- Vb = Volume of titrant for the blank (ml)
- N = Normality of the standard acid
- W = Weight of the sample (g)
- 1.4007 = Conversion factor based on the molecular weight of nitrogen and conversion to percentage.
- Protein Percentage (% Protein): The Kjeldahl method measures total nitrogen, not protein directly. An estimated “crude protein” content is calculated by multiplying the nitrogen percentage by a specific conversion factor, known as a Jones factor. This factor is based on the average nitrogen content of proteins in a given material.

Common protein factors vary by sample matrix:
- Dairy Products: 6.38
- Meat, Eggs, Corn, Feed: 6.25
- Wheat: 5.70
- Rice: 5.95
- Peanuts: 5.46
Applications of Kjeldahl Nitrogen Analyzer
The versatility of the Kjeldahl nitrogen analyzer makes it an indispensable tool in a wide range of industries for quality control, regulatory compliance, and research.
Food, Feed, and Beverage: Ensuring Quality and Compliance
This is the most common application area. Protein content is a critical quality parameter and is legally required on nutritional labels.
- Protein Determination: Used to verify the protein content of meat, dairy products, cereals, animal feed, and beverages to ensure they meet labeling claims and regulatory standards. For example, the price paid to dairy farmers for raw milk is often directly tied to its protein content, as determined by the Kjeldahl reference method.
- Quality Control: Monitors the consistency of raw materials, such as the protein level in flour for baking, and confirms the quality of finished products.
- A Critical Distinction: It is important to understand that the method determines “crude protein.” It measures total nitrogen and assumes it all comes from protein. This makes it a powerful and consistent tool for quality control but also means it can be misled by the presence of non-protein nitrogen (NPN) compounds like urea or, in cases of economic adulteration, melamine. An experienced quality control professional must be aware of this limitation when interpreting results.
Agriculture and Environmental Science: Monitoring Health and Impact
Nitrogen is a key nutrient in ecosystems, and measuring its concentration is vital for both agriculture and environmental protection.
- Soil and Fertilizer Analysis: Determines the nitrogen content in soil to assess its fertility, allowing for optimized fertilizer application. This helps maximize crop yields while minimizing costs and environmental runoff.
- Total Kjeldahl Nitrogen (TKN): In environmental analysis, the method is used to measure TKN, which is the sum of organic nitrogen, ammonia (NH3), and ammonium (NH4+). TKN is a key parameter for monitoring the health of water bodies and is a required metric for regulatory reporting at many wastewater treatment plants.
- Measuring Other Nitrogen Forms: The standard TKN analysis does not measure nitrate (NO3−) or nitrite (NO2−). To include these forms for a “total nitrogen” value, the sample must first undergo a reduction step, for example, using Devarda’s alloy, before the standard Kjeldahl digestion begins.
Pharmaceutical and Chemical Industries: Validating Purity and Content
In these highly regulated industries, precise quantification of nitrogen is essential for ensuring product safety and efficacy.
- Quality Control: The Kjeldahl method is used for the quantitative analysis of nitrogen in raw materials, intermediates, and final drug formulations. This ensures that products meet the strict purity and dosage specifications required by regulatory bodies like the FDA.
- Material Validation: Verifies the nitrogen content of active pharmaceutical ingredients (APIs) and other nitrogen-containing compounds, confirming their identity and purity throughout the manufacturing process.
Choosing the Right Kjeldahl Analyzer for Your Lab
Selecting the appropriate Kjeldahl analyzer requires a careful assessment of your laboratory’s specific workflow, throughput, and budget. The decision process can be broken down into four key steps.
Step 1: Assess Your Laboratory’s Needs
- Sample Throughput: The most important factor is the number of samples you analyze per day. A research lab running a few varied samples has different needs than a production QC lab running hundreds of routine tests.
- Sample Type: Consider the nature of your samples. Are they solids, liquids, or semi-solids? Do they have high fat content, which can cause foaming? The analyzer and digestion method may need to be optimized for your specific matrix.
- Budget: Evaluate the total cost of ownership, including the initial instrument price, ongoing reagent and consumable costs, and labor savings from automation.
Step 2: Select the Right Level of Automation
- Semi-Automated Systems: These units typically automate the distillation step but may require manual addition of reagents and an external or manual titration. They are a cost-effective choice for labs with lower sample volumes or non-routine analytical needs.
- Fully Automated Systems: These analyzers integrate distillation, reagent dosing, titration, result calculation, and waste removal into a single, seamless process. They offer the best reproducibility and drastically reduce hands-on operator time, making them ideal for high-throughput, routine analysis.
- Systems with Autosamplers: For maximum productivity, some fully automated systems can be connected to an autosampler. This allows for true “walk-away” operation, where dozens of samples can be loaded and analyzed sequentially without any operator intervention.
Step 3: Evaluate Critical Features
- Safety: Prioritize instruments with comprehensive safety features, such as a safety door that must be closed for operation, overpressure and overheating protection, and a highly efficient fume scrubber system.
- Compliance and Data Management: For regulated environments, ensure the instrument’s software is compliant with standards like 21 CFR Part 11. The ability to connect to a LIMS and generate GLP-compliant reports is also crucial for data integrity.
- Durability and Maintenance: Look for robust construction, such as a stainless steel housing and chemically resistant components (e.g., titanium condenser, technopolymer splash head). Features like automatic cleaning cycles can also reduce maintenance and extend the life of the instrument.
Step 4: Consider the Alternatives – Kjeldahl vs. Dumas
The primary alternative to the Kjeldahl method is the Dumas method, also known as the combustion method. A lab manager must understand the trade-offs between these two techniques to make an informed purchasing decision. The Kjeldahl method’s strength lies in its status as a robust reference method with high accuracy and flexibility for difficult sample types, whereas the Dumas method’s key advantage is its speed.
| Feature | Kjeldahl Method | Dumas Method |
| Principle | Wet chemical digestion and titration | High-temperature combustion and gas analysis |
| Time per Sample | 30–90 minutes | 3–5 minutes |
| Reagents | Sulfuric acid, NaOH, boric acid, catalysts | High-purity oxygen, helium/CO₂ carrier gas |
| Detection | Colorimetric or potentiometric titration | Thermal conductivity detector (TCD) |
| Sample Flexibility | High (handles solids, liquids, difficult matrices) | Moderate (can be challenging for liquids) |
| Cost per Analysis | Lower | Higher |
| Regulatory Status | Globally recognized reference method (AOAC, ISO) | Approved for many, but not all, applications |
| Key Advantage | High accuracy, versatility, established standard | High speed and throughput, no corrosive liquid waste |
Frequently Asked Questions and Troubleshooting
Effective use of a Kjeldahl analyzer involves not only running the instrument but also understanding its limitations and knowing how to diagnose problems. Most issues in a modern lab stem from sample preparation or chemistry, not hardware failure.
Common Questions (FAQ)
- What forms of nitrogen can the Kjeldahl method NOT detect?
The standard Kjeldahl method does not quantitatively recover nitrogen from compounds containing nitro groups (R−NO2), azo groups (R−N=N−R), or nitrogen within certain heterocyclic rings (e.g., pyridine, quinoline). It also does not measure nitrate or nitrite unless a specific reduction step is performed prior to digestion. - What are the most important safety precautions?
Due to the use of hot, concentrated sulfuric acid and sodium hydroxide, all work must be performed in a well-ventilated area. The digestion step must be connected to a fume hood or an efficient scrubber system. Always wear appropriate personal protective equipment (PPE), including safety goggles, a lab coat, and acid-resistant gloves. - Why is a “reagent blank” necessary?
A reagent blank is a crucial quality control measure. It is an analysis performed with all reagents but without any sample. The result from the blank is subtracted from the sample result to correct for any trace amounts of nitrogen contamination in the reagents themselves, ensuring the final value reflects only the nitrogen from the sample. - What is a protein conversion factor?
It is an empirically derived multiplier used to estimate the “crude protein” content from the measured nitrogen content. The most common factor, 6.25, is based on the assumption that the average protein contains 16% nitrogen (100/16=6.25). However, specific factors exist for different food types to provide a more accurate estimate.
Troubleshooting Common Problems for Kjeldahl Nitrogen Analyzer
A systematic approach is the key to efficient troubleshooting. Start by checking the most likely sources of error: the sample, the chemistry, and then the hardware.
- Problem: Low Results
- Causes: The most common cause is incomplete digestion due to insufficient time, a temperature that is too low, or not enough sulfuric acid for the sample type (especially high-fat samples). Other causes include sample foaming out of the tube during digestion, insufficient sodium hydroxide added during distillation (which prevents complete conversion of NH4+ to NH3), or the condenser tip not being submerged in the receiving solution, allowing ammonia gas to escape.
- Problem: High Results
- Causes: This is often due to contamination. Check for dirty digestion tubes or carry-over from a previous, high-concentration sample. The most frequent analytical error leading to high results is forgetting to subtract the reagent blank value from the sample calculation.
- Problem: Poor Repeatability (Inconsistent Results)
- Causes: The number one cause of poor repeatability is a non-homogeneous sample. Ensure sample preparation is thorough. Other potential causes include uneven heating across the digestion block, leaks in the distillation system (e.g., a worn or poorly sealed tube adapter), or inconsistent dispensing from reagent pumps.
- Problem: Instrument-Specific Issues
- No Steam: Check that the water supply to the generator is full and connected. If the unit still doesn’t heat, check for a blown fuse or a burnt-out heating element.
- Violent Bumping During Distillation: Some vigorous boiling is normal when steam is injected into the hot alkaline solution. Modern analyzers are equipped with overpressure protection systems to ensure this is not a safety hazard.
Proactive Quality Control
The best way to troubleshoot is to prevent problems from occurring. Regularly verifying the performance of the entire analytical system with certified reference materials is a cornerstone of good laboratory practice.
- Distillation and Titration Check: To verify the back end of the system, analyze a known weight of pure ammonium sulfate. Since this does not require digestion, it directly tests the efficiency of the distillation and titration steps. Recovery should be greater than 99.5%.
- Full Method Check: To verify the entire process, including digestion, analyze a pure organic compound with a known nitrogen content, such as tryptophan or acetanilide. This tests the digestion efficiency as well as the distillation and titration. Recovery should be greater than 98.5%. If the ammonium sulfate check passes but the tryptophan check fails, the problem lies specifically within the digestion step.
Practical Hands-on Experience: Review page: Complete Guide to Kjeldahl Analyzer Operation and Maintenance.
If you are ready to find the right Kjeldahl Nitrogen Analyzer for your laboratory, please browse our complete product range: Kjeldahl Nitrogen Analyzer
This guide is maintained by HINOTEK’s core technical team, comprised of senior engineers and application scientists with over two decades of hands-on experience in fields such as microscopy, centrifugation, and Kjeldahl Nitrogen Analyzer. We are committed to ensuring that every piece of information in this guide—from instrument principles and technical specifications to laboratory procurement advice—maintains the highest level of accuracy and timeliness.
This content is regularly reviewed and updated to reflect the latest industry standards and technological advancements. We value feedback from the global scientific community. Should you have any questions or suggestions, or wish to discuss any technical details, please do not hesitate to contact our expert team at [email protected].
Works cited
- Kjeldahl Nitrogen Analyzer: Efficient Nitrogen and Protein Analysis – AELAB, https://aelabgroup.com/kjeldahl-nitrogen-analyzer-efficient-nitrogen-and-protein-analysis/
- Kjeldahl Method: Principle, Steps, Formula, Equipment & Applications – Borosil Scientific, https://www.borosilscientific.com/kjeldahl-method-principle-steps-formula-calculations-procedure/
- Kjeldahl method for nitrogen and protein determination, https://www.gerhardt.de/en/know-how/analytical-methods/kjeldahl-method/
- Kjeldahl method – Wikipedia, https://en.wikipedia.org/wiki/Kjeldahl_method
- What should we know about Kjeldahl Method and Kjeldahl Analyzer – MRC Lab, https://www.mrclab.com/what-should-we-know-about-kjeldahl-method-and-kjeldahl-analyzer